The Ultimate Guide to Creating a Successful Video Marketing Campaign: 21 Steps To Create Awesome Video
Let's be clear. Video NEEDS to be part of your content marketing strategy.
Why? I'll let the numbers talk:
Social media posts get 48% more views when they are videos and generate 1,200% more shares than text and image content combined. (Source)
Video can also increase conversion by up to 80%. (Source)
43% of customers want brands to share information about their products or services in video. (Source)
74% of marketers say video has a better return on investment than static imagery. (Source)
Chances are you really didn't need any statistics to tell you that video is super important in any content marketing plan. You know that it can improve the conversion rate of your landing page.
Check out the 21 steps you need to crush you video marketing game 👇
Top Reasons Why People Don’t Use Video in Their Content Marketing Strategy
Upload Your Video and Write a Mini Blog Post in Its Description Box
Chop Up Your Video to Repurpose It for Social Media Channels and More
Use Your Thumbnail Image in Your Next Email to Get More Clicks and Promote Your Content
Analyze Your Click-Through Rate and Watch Time of Your Videos
How to Track Video Views in Google Analytics and Google Tag Manager in 4 Steps
1. Top Reasons Why People Don’t Use Video in Their Content Marketing Strategy
The top 3 barriers most people experience with video creation is that it’s too:
Time-consuming.
Complicated.
Expensive.
Also, 80% of marketers would create more videos if they knew an easy way.
I see you! Let me show you an easier way.
Having an effective video marketing strategy comes down to three elements. Videos must be:
Valuable: Your videos must make your target audience's life better in some way. What knowledge can you drop that will help people in their day-to-day?
High-Quality: They will not make people sick, irritated, or frustrated while watching them. No shaky camera work. No breathy whispers that you can't hear.
Consistent: One highly-produced video every 3 years won't cut it. People need to see you on a regular basis.
Listen, video isn't just for social media influencers. It's for you, too! Using video right will help you to create evergreen SEO content that will attract new audiences and potential customers.
Let's break down video production steps one at a time, and then I'll address some of the biggest questions that people have about using a video marketing strategy for their business.
2. Review Your Competition
Of course, you want to jump right into creating video, but this is a CRUCIAL STEP.
Consider the topics that you would like to explore through video. Type them into YouTube and look at some of the top-ranking videos on the first page of results, along with their view count.
What do they do well?
What do they leave out?
How can you do things better?
Perhaps the most important question in all of marketing is what makes you different?
Here are a few things you can think about when it comes to helping yourself stand out from your competition.
Can you be more consistent? If they post once a month can you post once a week?
Can you go deeper? If they are scratching the surface, can you give more depth in a way that is helpful to the viewer?
Can you be more simple? No one watches a video and says, “I wish that was more complicated,” but they do wish things were easier, more step-by-step, or common speak. Can you create content without jargon?
Can you be more human and funny? There will always be someone with a better camera and a bigger team and more money behind their videos. But you have a secret weapon: your experiences and your humor.
Use them.
3.List Your Topics and Titles Before You Shoot Your Video
YouTube is a search engine. It is the second biggest search engine in the world behind Google. Google bought YouTube. YouTube videos pop up in Google search results.
Publishing your content on YouTube allows it to be evergreen. It's fine if you want to use other video platforms too, like Wistia or Vimeo, but if you want to use video to market a business, it needs to be on YouTube as well.
If you want your content to appear in search results, you need to use the actual words that people are typing into video search engines.
First, create as many video topics as you can think of using your primary and secondary keywords.
How often should I publish videos on YouTube?
Go to your long-form blog posts and look at sections or even posts that would be great to have in video form, too. Create as many as you can. Ideally, a list of 52. One for every week of the year.
That's right: Your goal is to publish one video a week. Publishing more than that a week does not show a significant ROI. Later in this article, I'll show you how to batch create a video so that you can get way ahead, but you are going to need to start with some ideas first.
How to Use YouTube to Find Your Video Titles
Once you have your list of ideas we need to turn them into titles that people actually use when they are looking things up on Google.
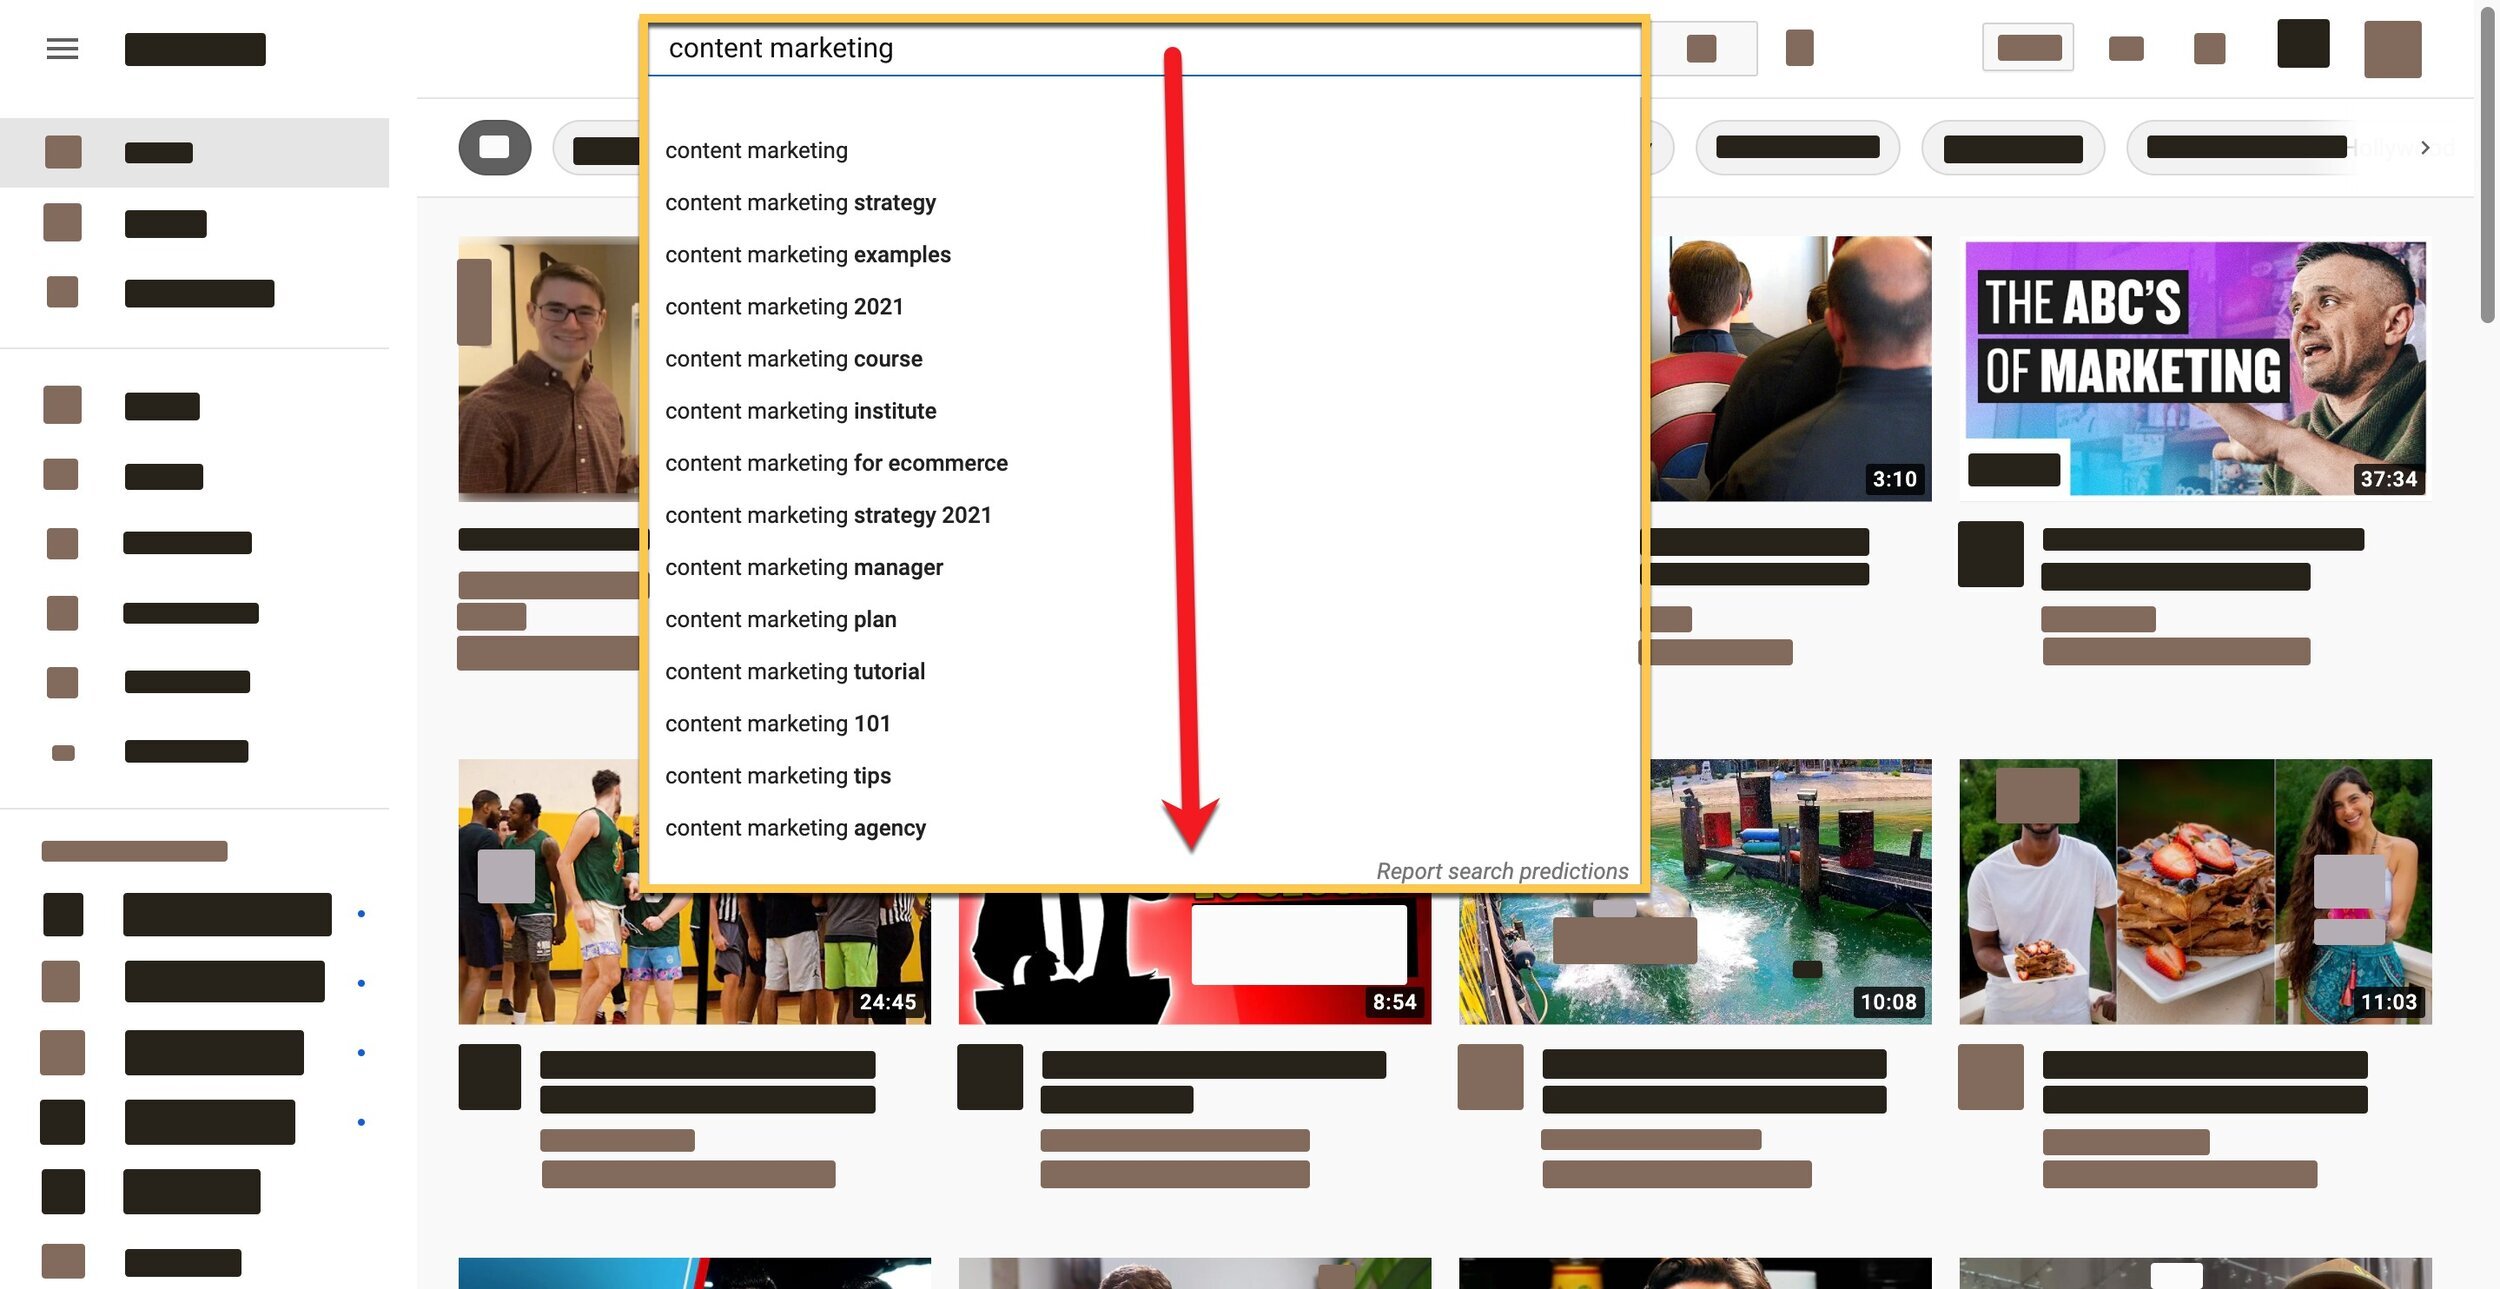
Type the primary keyword into the YouTube search bar but do not press enter.
Below you will see the top list of things that are searched for on YouTube. The closer to the top it is, the more it is searched for.
Next, add an underscore before or after your keywords with a space. This is called a wildcard. Now you will notice top-ranking, longer tail search queries.
You could stop here and get a pretty great title, but if you want to take it one step further you will use TubeBuddy.
TubeBuddy is a free tool with additional paid options that help you optimize your YouTube videos.
You can type in a title and it will tell you how much monthly traffic that title gets, the competition for that video, and how much people have optimized their content from search results.
Once you have found the title for your video, make sure you use that title in the script because YouTube transcribes every video uploaded to ensure that the content in the video matches the content in the title.
Using the exact words of your title somewhere within the first couple of lines of your script is a great way to ensure the video will actually perform higher in search.
4. Create a Script
You are probably not a professional improv artist. Sure, you know a lot of stuff, but if I asked you to explain it you might also leave some stuff out, repeat yourself, or say things in a complicated way.
You. Need. A. Script.
When you have a script, it forces you to be concise and also ensures that you cover everything. Here is an outline for a killer script.
Start with the problem.
Humans love conflict.
It allows us to enter narrative transportation.
Draw your audience in by drawing it out.
This also lets your viewers know:
They are in the right place.
You understand their struggle.
Example: Tying a bowtie can feel frustrating. You are all dressed up, wearing your fancy clothes, and you begin to sweat because it's the 30th time you tried to do it. By now your biceps are cramping and you’re ready to hulk off your dress shirt and send buttons flying.
Explain the benefit of what your video offers.
State how you will help them. Don't go over features. Give benefits.
What will be the result of watching your video?
Example: Fear not, I'm gonna make this whole bow-tie thing simple so you can get right to your swanky party.
Here is another video example showing how to complete the benefits section of your video starting at the 9-second mark
Introduce yourself.
Most people start with this.
No one knows you.
Really, no one cares.
Sorry, I know that's harsh, but it's true. They just want to know that you can help them solve their problems. After you solve their problem, then they will care more about you. Don't sell anything, just state your name and what you do.
Solve their problem or pain point.
Actually, help them. Make it simple. Show them how it works with examples.
Example: Here is how to tie a bowtie in 30 seconds, step-by-step.
Give a final call to action.
What do you want them to do next? Do you want them to watch another video? Check out a blog post that you have linked up in the description box for more details? Check out your website? Download a free tool?
5. Get a microphone
It's important for people to be able to hear you well.
The Lavalier microphone, also known as a lapel mic, is your cheapest and best solution. You can get one for about $20.
I personally like the Rode Link Wireless Microphone. It is more pricy but will allow you to move around without having to worry about pulling your camera down from your Tripod.
I also started my podcast using this microphone so it can be used for multiple purposes.
Attach it to your collar or anywhere above the nipple line on the front of your shirt. Feed the wire through the inside of your shirt but don't worry about hiding the actual microphone. You are not filming a drama where a mic would interrupt being immersed in the story.
If you are filming on your phone, this will be plugged into your headphone jack. If you are filming on an iPhone, you will probably need a lightning jack, too.
6. Set Up Your Phone or Camera so That You Can See Yourself
There is no worse feeling than filming a ton of video content and realizing your head was cut off. The best way to prevent this is to use either the front-facing camera on your smartphone or a mirrorless camera like the Sony A6400.
You will need a tripod of some sort to set the camera up at eye level. There are tons of tripods that are pretty cheap and will get the job done. Remember that you will need a cell phone mount if you are filming on a phone.
After you’re all set up, look for just a bit of space between the top of your head and the edge of the shot. Anything too close has real Jack Nicholson vibes.
7. Make Sure You are Well Lit
Lighting should not be rocket science. Find the brightest place you can. Turn on all your lamps, but note that natural light is the best.
If you don't have an area with natural light, you will need to buy a light. A ring light works pretty well at mimicking natural light, but you can also get a basic light set for just a little bit more.
The goal is to not be overexposed but to be clearly visible to the human eye. That's all.
8. Make Sure Your Backdrop Is Clean
Pick up those clothes that haven't been folded off your bed. Move your 30 empty Lacroix cans out of the shot.
The more simple the background, the better.
If you have a bare wall, awesome. Avoid complicated bookshelves or anything in the background that you could blend into.
Make sure your shirt and clothing won't blend into the backdrop either. If your backdrop is light, wear a darker color and vice versa.
Avoid patterned clothing and opt for solid colors. Patterns can do weird things on camera and can make it difficult to come into focus depending on what kind of camera you are using.
9. Use a Teleprompter
Reading a script off a teleprompter is much easier than memorizing a script. Copy and paste your script into a teleprompter app.
Download the Video Teleprompter App for IOS or something similar on Android. No need to buy a fancy teleprompter. The key, whether you are filming directly on your phone or with another device (and yes, you can film on your phone while using the teleprompter app), is to make the words as close to the camera lens as possible.
Set the font size as small as your little eyes can see. This way, your eyes won't look like they are tracking across a page. When the words are small and close to the screen, it will appear as if you are looking right into the camera lens.
Additionally, most teleprompters will allow you to connect it to a laptop or keyboard via Bluetooth. This is helpful if you are sitting at a table and don't want to get up every time you need to re-do a section of the script.
10. Wipe Off Your Lens and Film Some Test Takes
You will probably need to adjust a few things from your initial setup. Do some test takes. Make sure the microphone is working. Make sure you have a little bit of space from the top of your head and the end of the frame.
Sit up straight. Play with the speed of the teleprompter to find a rhythm that works for you.
11. Batch Your Video Content
You spent a good amount of time setting things up. Make the most of it by having 3-10 scripts ready to film at a time. This allows you to get ahead in your content creation process. When you batch film and batch edit, then you can stagger the release of your content and be consistent.
Don't film one video at a time.
Keep doing a take until you get one you are happy with, and then go on to the next section. This will come in really handy later on in the editing process.
Also, be sure to shoot in landscape mode on your phone. You will be able to create edits later on for other formats, but only if you start with landscape mode.
12. Shoot Your Thumbnails
A video thumbnail is a static image that shows before you click on a video.
The easiest way to make thumbnails, later on, is to take screenshots from a bit of footage so you have a ton of options. Smile at the camera and... hold. For around 3-5 seconds.
Point to your left.
Point to your right.
Look confused.
Now growl! Show me a tiger.
Seriously, it is helpful to batch shoot yourself in a ton of static poses. Later, when you create thumbnails for the videos you will have a lot to choose from. Have fun and make silly faces.
These need to be interesting because they will help people click on them.
13. Edit Your Video
The first time I met someone who created a video and made words pop up on the screen while they were talking, I was convinced they were a sorcerer. It seemed like the most amazing thing I had ever seen.
Yes, if you are editing videos for the first time, it will take you a little while to learn. But, I am going to give you everything I wish I had known to save you tons of time and to help you create videos faster.
Choosing your video editing platform and trimming your footage
I recommend beginners start out with WeVideo. I have tried a bunch of different ones and found it to be the easiest to learn for most people's business needs.
I love WeVideo because:
It's designed with beginners in mind. In fact, many kids use it in their school programs.
Everything is stored in the cloud. This means that you can edit from any computer anywhere which is super nice.
It has tons of stock b-roll, transitions, and lower-third graphics (words that you can make appear on the screen).
You can export videos in high quality, up to 4k.
See my complete guide to using WeVideo to edit your videos.
5 video editing essentials to keep people watching your videos and increase attention span
When creating videos there are only a few fundamentals that will help people stay on your videos longer and engage with your content. If you follow these things you are guaranteed to help more people.
1. Jumpcuts
Jumpcuts are increasing and decreasing the size or scale of a shot to make your video more dynamic. A talking head video can be kinda boring, but adding these can make it a little more interesting.
Look for parts in your video were you are pausing, ending a sentence, or moving on to another topic. Increase the size of that clip just a little bit. Try to keep your eyes in relatively the same position.
If you zoom in too much, your footage may appear blurry. Try not to do that. Alternating between your standard shot and your zoomed-in shot is really all you need here.
2. Lower thirds graphics (words on the screen)
Adding 1-5 words on a screen that summarize the gist of what you are saying on camera can be helpful to drive home a point.
Usually, these are called lower third graphics because they appear in the lower left or right-hand third of a shot. Remember to not put too much text or all the text that you are saying onto the screen because then it just becomes like subtitles.
Think of these graphics as highlighting the important parts of your script. Also give your viewers enough time to read it. A good rule is around 5 seconds.
Another option for graphics is to upload a png image with a transparent background onto your footage. This is great for things like arrows or book covers. You can create and use images from a tool like Canva to put these elements into your videos.
3. Music and sound effects
The best music is the kind you can barely tell is there. This can also offset some audio glitches, too.
I personally like to use audio in jump scenes (more on those later) to set the mood and to make videos funnier.
Sound effects add speed to your video. I am a big fan of whooshes and swishes in-between scenes. They make me feel like I'm in a kung fu movie.
Also, consider using a different sound effect when you show your lower third graphics or b-roll. For me I tend to use a bubble pop sound but you can use anything, like a frog croaking or a cow mooing.
Be careful not to get too carried away on these, otherwise they can make your videos distracting. Artlist is my go-to resource for orginal, license-free music and sound effects.
4. B-roll
B-roll is footage that you overlay on top of your regular footage to break things up and to show examples of what you are talking about.
You can shoot your own B-roll. This is helpful if you are talking about a product, or something that you are actually in close enough to film.
Another option, and one that will probably save you a bunch of time is to use stock B-roll from other sites. I personally like Storyblocks and Artgrid.
But as you can see in my WeVideo editing tutorial, if you pay just a bit more you get access to a huge library that you can just drag and drop onto your footage which saves a ton of time.
Another option is using a site like Giphy to get cool short animated clips for your footage. Look for higher quality gifs. They are out there! Try not to make them too big, though, because this will also distort the quality.
5. Humor
I totally get that being on camera can be intimidating, but the more casual you are, the funnier you are, and the more people will actually like your videos.
Otherwise, why wouldn't you just use a robot?
Also, there are probably a million videos out there on the stuff you are going to cover, so what will make you stand out? Chances are your competition will be perfectionist stiff automatons.
So, be human and be funny.
This will set you apart.
There are two things to think about with humor:
1. The Rule of Three’s
Someone else probably came up with this before me and calls it by a different name, but this is what I call it. For every two-thirds of valuable information you give, give one third of humor.
If you’re giving facts, give two solid statistics and one outrageous lie.
Give two examples of what to do and one example of what not to do in a goofy way.
This will loosen you up during the filming process and also make your videos a lot more fun.
2. The jump scene
A jump scene is when you go from one scene to something completely different… super fast. Usually we do this for flashbacks, examples, or contradictions.
For example, in a product video I mentioned that adding images to your email can help make them more fun and then I showed a jump scene of me laughing like a crazy person at my computer.
Adding humor to your script
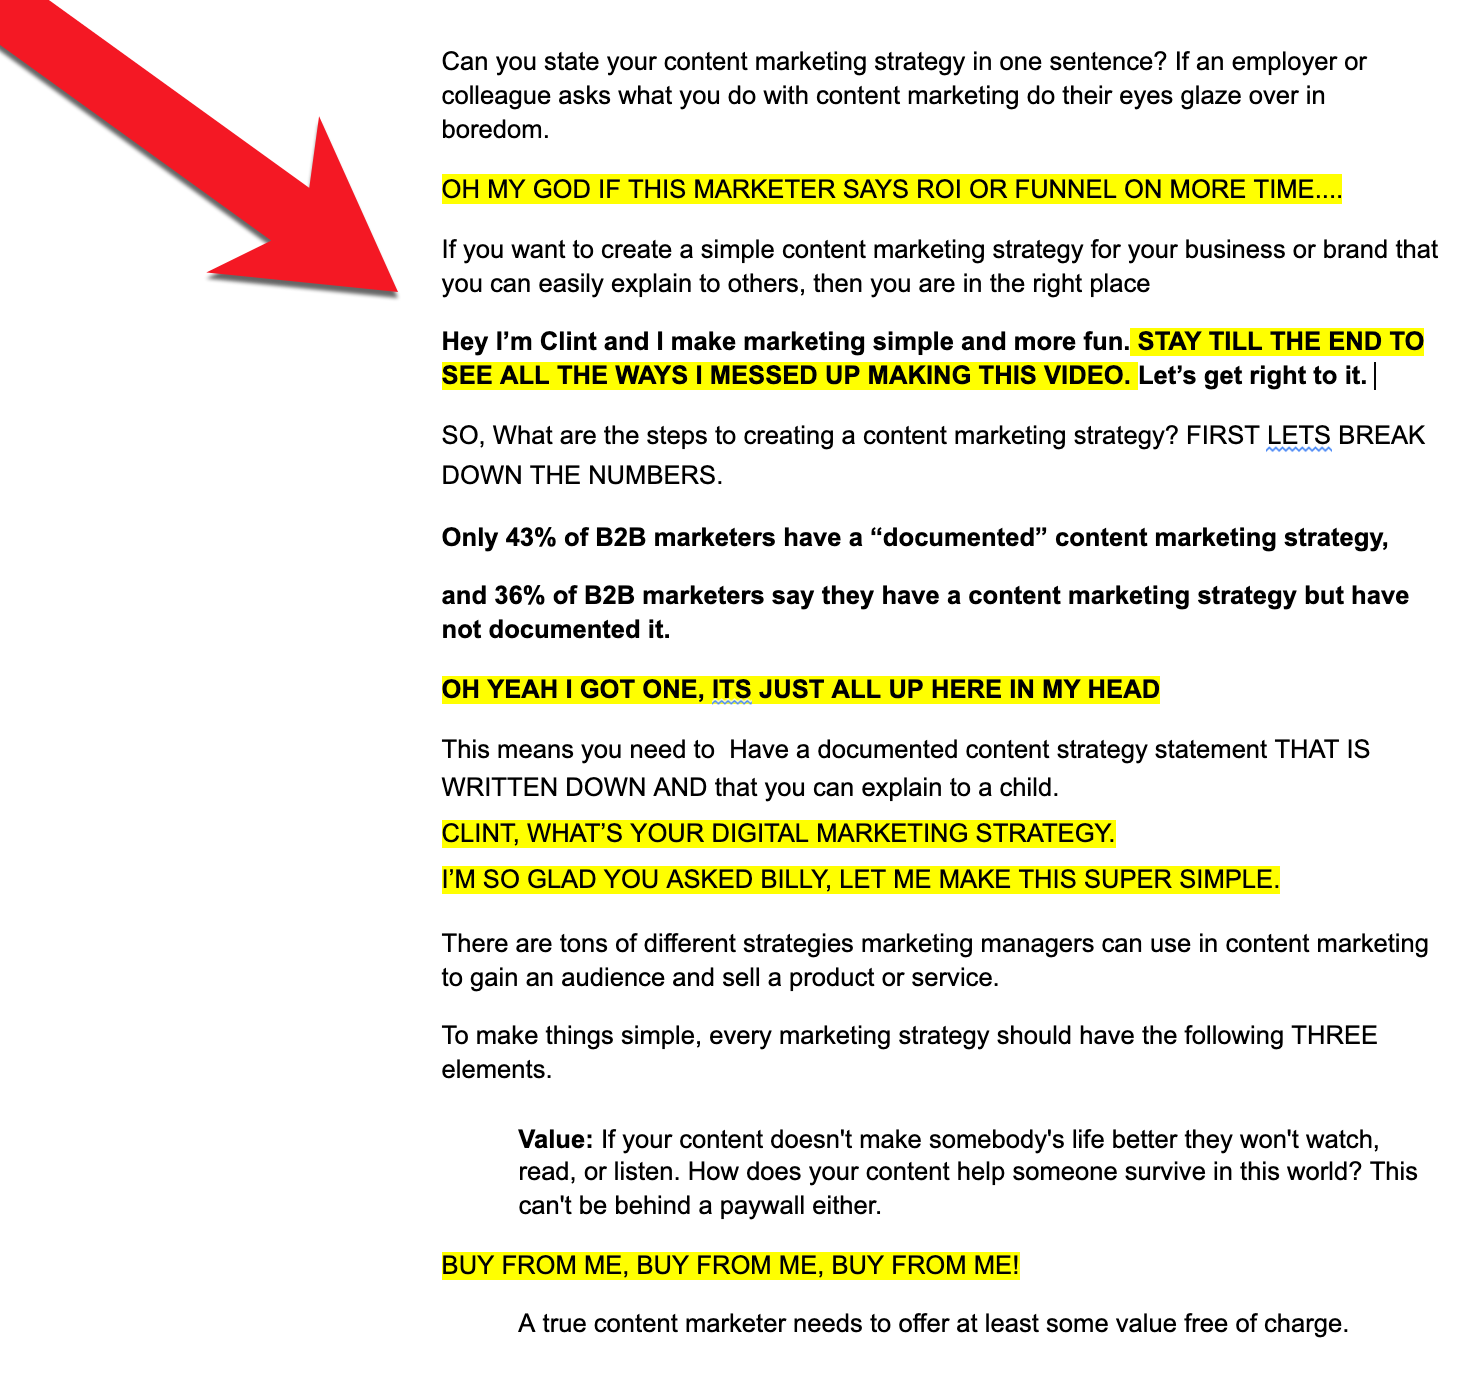
A way to ensure you have added enough humor is to write your humor sections in all caps, and highlight them on your document. Then, zoom out and see if one-third of your script is looking yellow and shouty.
Having humor in all caps will also cue you to know this is meant to be a funny part when you are reading off a teleprompter.
14. Creating a Title and Thumbnail for Your Video
Creating a thumbnail is like a marketing Haiku. It can only have a few essential things in it, but it should still convey meaning.
Here are the basics:
Make it bright: Color stands out, bright color stands out more.
Put a human face on it: People buy from humans. People watch humans.
Preferably, the face in your thumbnail should be looking at the title. Studies show that we look at what other people are looking at.
Point or use an arrow: Pointing at a title or having an arrow pointing at a title also helps to direct people’s attention.
The words on your thumbnail and your video title do not need to be the same. Thumbnails make people stop scrolling and look at the video title. It needs to be interesting enough to make someone want to click on it.
15. Upload Your Video and Write a Mini Blog Post in Its Description Box
It's time to post your video on YouTube. Upload it in the highest quality possible. Add your thumbnail, double check your video title, and then get ready to tackle your description box.
You can include up to 5,000 characters in your description box.
Make the most of it.
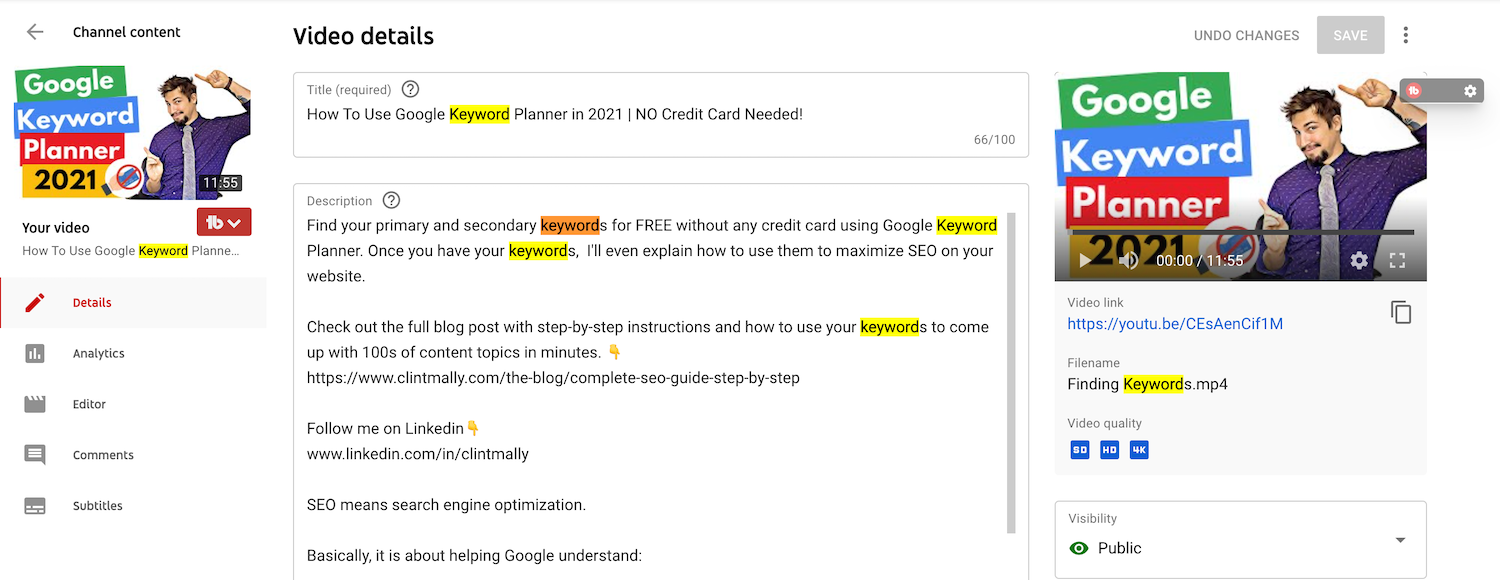
Your description box is one of the ways people can learn more about your content, BUT it's also one of the ways YouTube determines if you should rank for a keyword in search results.
To recap, you want your primary keywords in:
Your video title.
In the words you actually say in your video.
In the first 1-3 sentences of your description box.
In your tags (more on this later).
Here is the breakdown on the perfect structure of your description box
Start with one to three sentences explaining what your video is about using your primary keywords.
Drop any links to your website or products or resources that you mention.
Give a more complete description of what is in the video.
Of course, if you have been following the right steps, then your script was already written before you shot the video. So, just drop your script in here. If your script is modified from a blog post, which is what I do, then it will already be keyword optimized.
16. Tag Your Video
The data is mixed on whether or not tags really help your video to rank in search or help other people discover your videos.
Tags are terms that are related to the content of your video.
Always make your first tags your primary keywords.
After that, give any related words that are connected with your content that someone might search for.
TubeBuddy has a really awesome tag selector that suggests tags based on the transcription of the words that you say in your video.
Don't overthink this part, but don't neglect it either.
17. Chop Up Your Video to Repurpose It for Social Media Channels and More
Once you have published your video, it's time to maximize all that hard work you did across your social networks.
Your first step is to put your video on a related blog post.
Placing your video above the fold on your blog post (so it’s visible without needing to scroll down) is a great way to reduce the bounce rate of your blog and increase dwell time. Both are great for a healthy blog.
If you don't have a blog you at least have a script, and guess what?
That's your new blog post.
Take your blog post and turn it into a script, or take your script and turn it into a blog post.
This is content batching, and it’s super efficient.
Plus, many people are relieved to see a video on a blog post. Everyone consumes content differently and it's nice to give your tribe options.
Chop your longer video into social clips.
The easiest way to use video in your social media marketing is to take your long-form video and break it up into as many 29-second or 59-second clips as you can.
Put the video in square format. An easy way to do this is through Veed.io which you can use for free.
A square video maximizes the screen size on every social platform, and it provides an easy way for you to add titles and subtitles to your video.
It doesn't matter if your video is for LinkedIn or Instagram.
Make it square.
85% of social media videos happen with the sound off, so if you actually want your videos to get some engagement you need to add subtitles. Veed.io will automatically transcribe your video for free, too.
After you upload the video you will still want to go through and double-check to make sure the subtitles are all correct.
Put the subtitles at the bottom of the video and put an emotionally engaging title on top. You'll notice that you'll be able to get a whole lot of social media videos this way.
These short social media videos will tease the rest of your content. In your captions simply tell viewers that they can see the full video or get an even deeper walkthrough by clicking the link that’s in your bio or right within the text.
This is yet another great reason to put your video on your website. Now, you are actually giving people a good reason to click to your website from social media because you have awesome content.
Schedule your videos across all your social media platforms. Even if someone watched all of your video from start to finish, seeing it on social media will give that same person a reminder and the ability to easily share a section with others.
18. Use Your Thumbnail Image in Your Next Email to Get More Clicks and Promote Your Content
You made something valuable, so share it with your email list.
After much experimenting, I noticed that my click-through rate and open rates are much higher when my emails contain a video thumbnail in them.
They get even more clicks when videos have a play button and a control bar at the bottom.
Why?
People like to know what they are clicking on. A URL or link leads to a destination that your audience might not know.
A video seems more clear.
A video with a thumbnail seems even more clear.
A video with a thumbnail and control bar, well... that's crystal clear.
Again, send people to your blog post with your video embedded on it. All content marketing should eventually lead people to your awesome website.
19. Analyze Your Click-Through Rate and Watch Time of Your Videos
Video Metrics Worth Tracking in Content Marketing
Video, especially on YouTube, is really easy to track. Of course, you want your videos to gain a ton of views and subscribers, but what if your videos are getting no results?
YouTube measures two results above all else:
1. Click-through rate: Do people click on your video?
Are your thumbnails and titles interesting enough?
YouTube is a hybrid of entertainment and information. Creating a title here can be challenging. You want to make someone interested and offer some value.
If your blog post title is business casual, you are going to need to throw a leather jacket on for YouTube. Keep the primary keyword of your title, but change up the rest to invoke curiosity and intrigue.
Your thumbnail needs to be bright and colorful. It should have a human face on it, and ideally, that human face is looking at the title of the content. Humans have a natural tendency to look at what they see other humans looking at. (Source)
2. Watch time: Do they stick around and watch your content until the end?
What I love about video is that you can get real, honest feedback. Your friends and family are too polite to tell you when your video got boring and they lost interest, but your YouTube viewers have no reason to lie.
You can track the drop-off rate to see where most of your viewers stopped watching your video. Then you can change your video, or create a different video that holds their interest better.
For new YouTube channels or for channels that are just not seeing results, treat this as training for a race.
Start with small distances, and go longer as you get in better shape.
People usually only want to watch a long-form video once they have established a trusting relationship with a person and identified them as an influencer. Most of us won't watch a stranger’s 20-minute+ YouTube video.
See if you can keep the attention of your audience for 2 minutes, and build up from there.
Also, many people prefer short videos over longer videos depending on the content. If I have a video editing question, I want that problem solved as quickly as possible.
However, there are only a few creators who make videos in that 2-minute mark. Most are 7 minutes or more.
Separate your content between quick tips and longer-form ideas. Save the longer-form ideas for later.
20. How to Track Video Views in Google Analytics and Google Tag Manager in 4 Steps
Using Google Analytics and Google Tag Manager you can add a trigger to a YouTube video embedded on your site. This allows you to track what people do after they click on your video, or even how many people are clicking on a video on your site.
This can be helpful in determining if a video is helping your blog post increase dwell time or if a video helps people convert on a landing page.
Step 1: Create the Variable
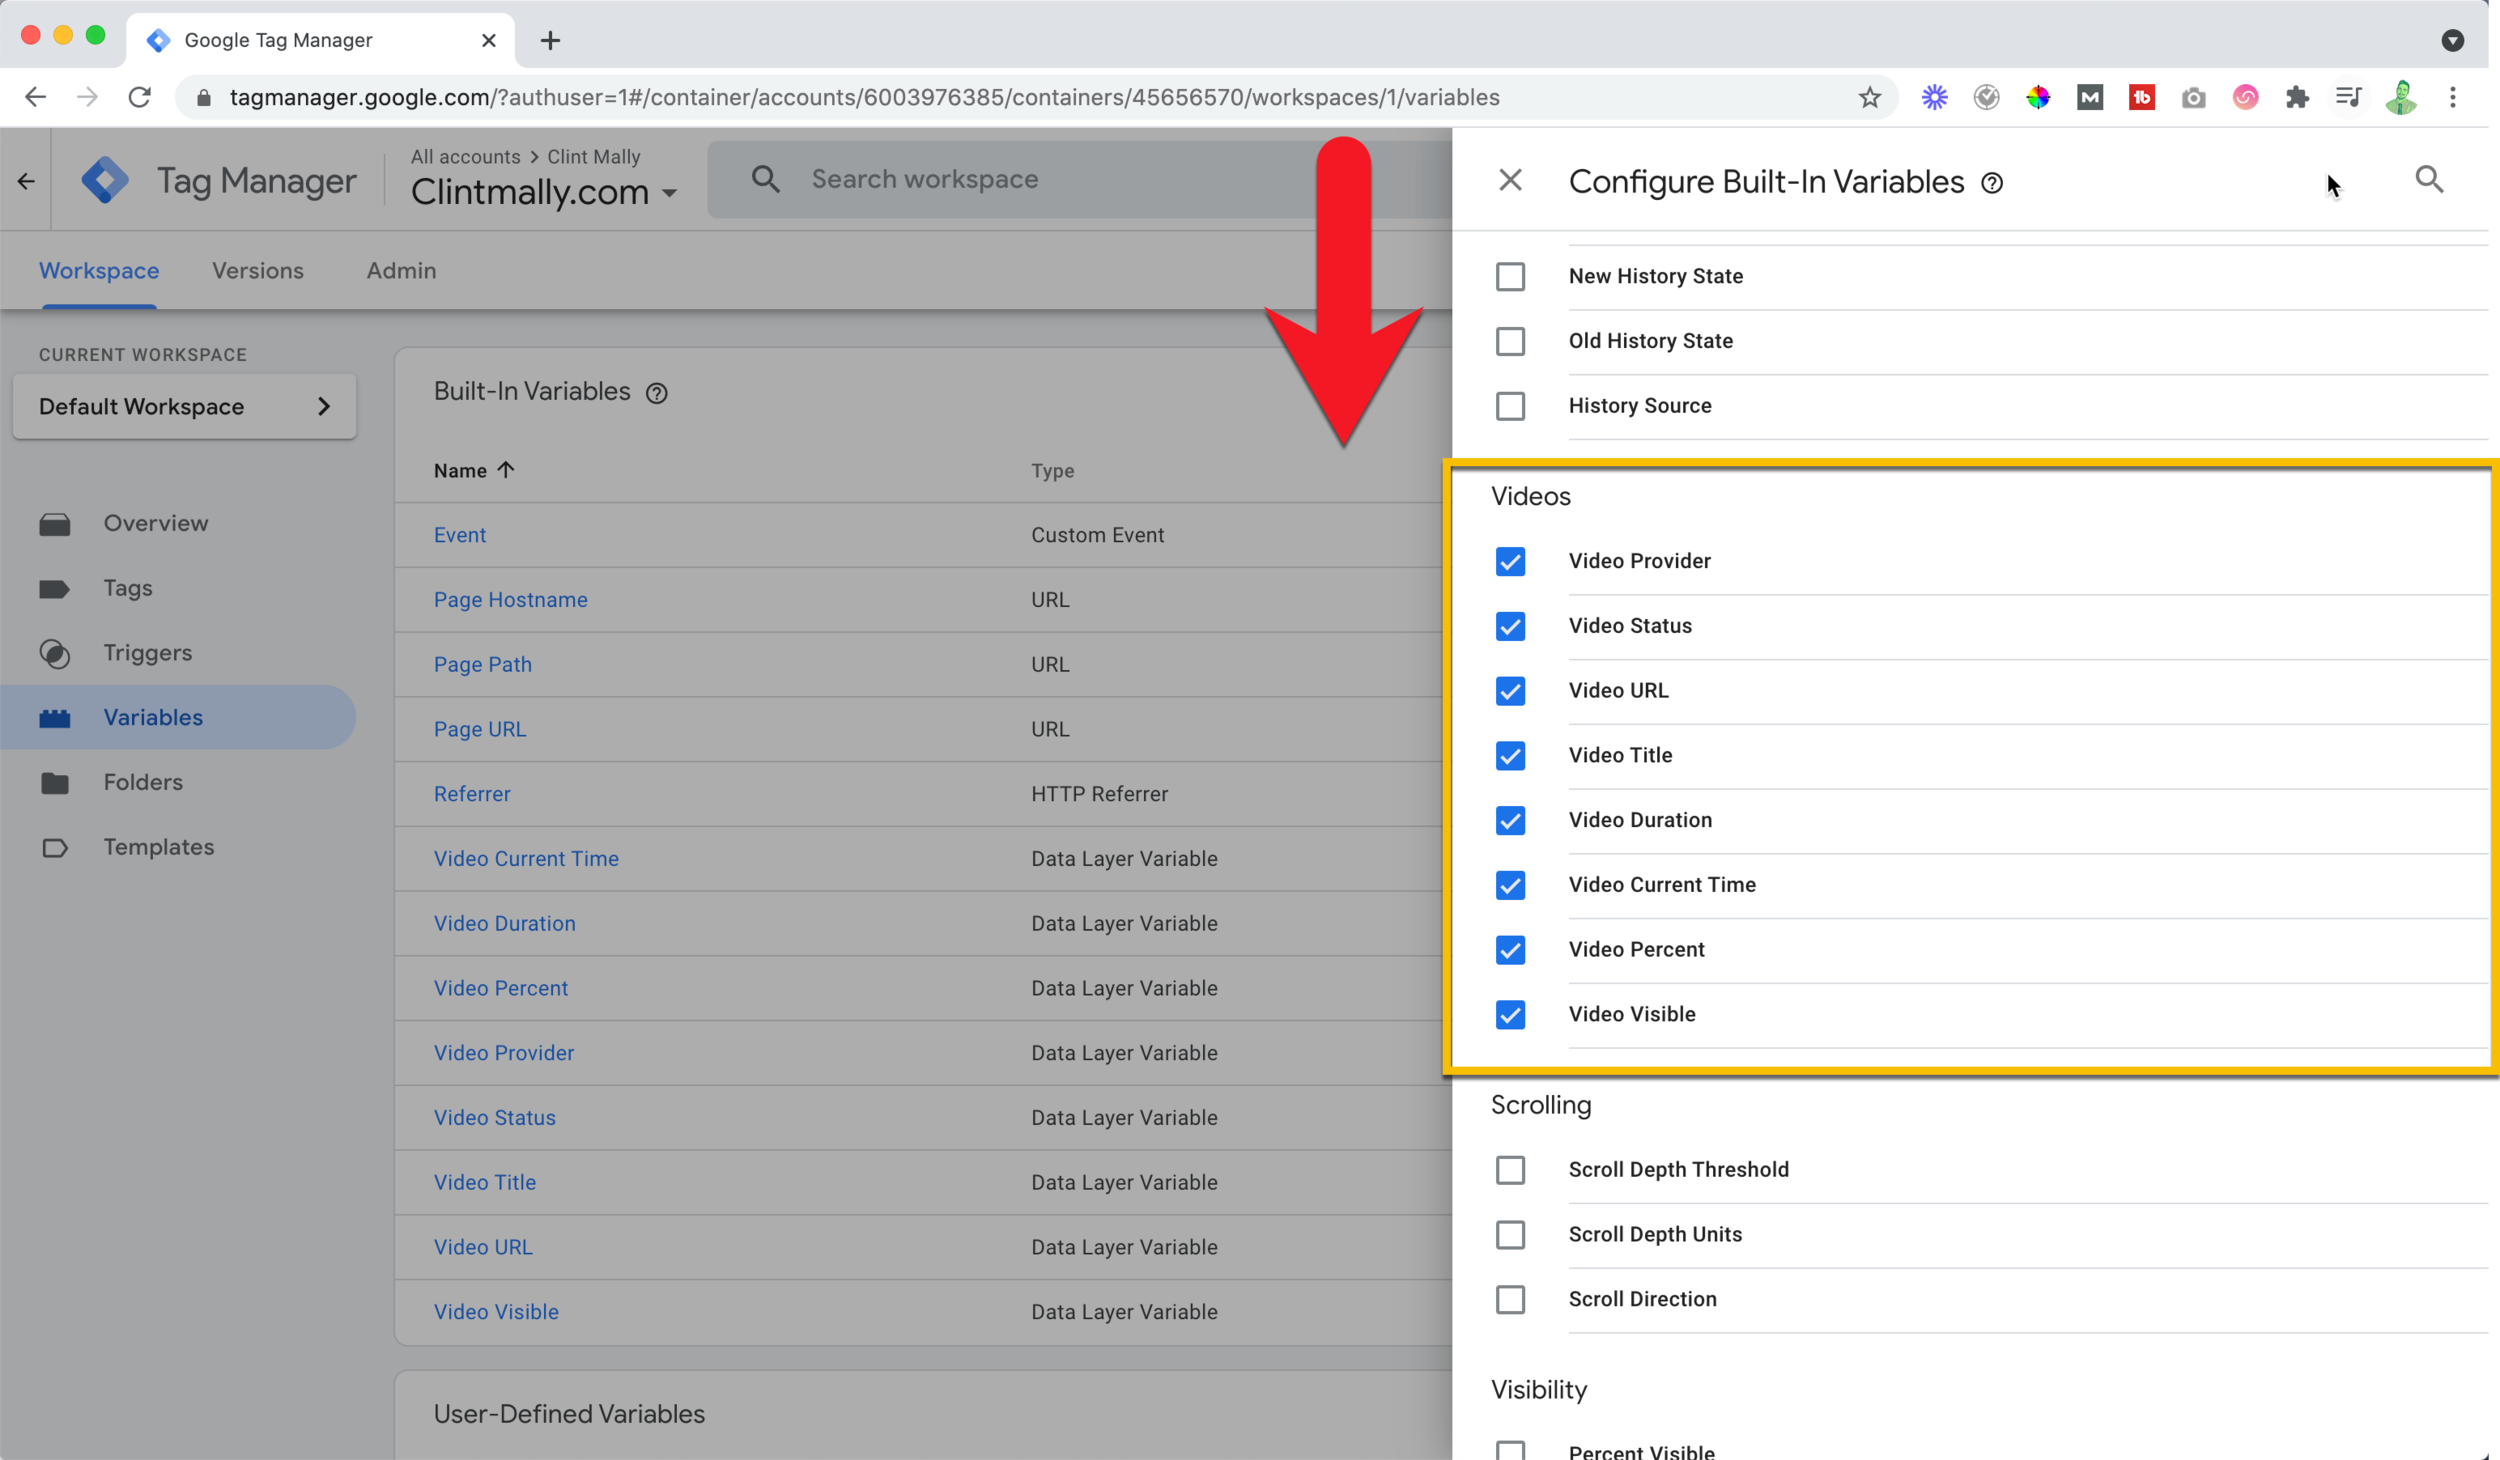
Go to Google Tag Manager and click "variables" in the left navigation.
Click "configure" in the top-right.
Scroll down the built-in variable until you get to the "videos" section. Click all the boxes here to track everything about your video, and then click out of the “configure” area.
Step 2: Create the Trigger
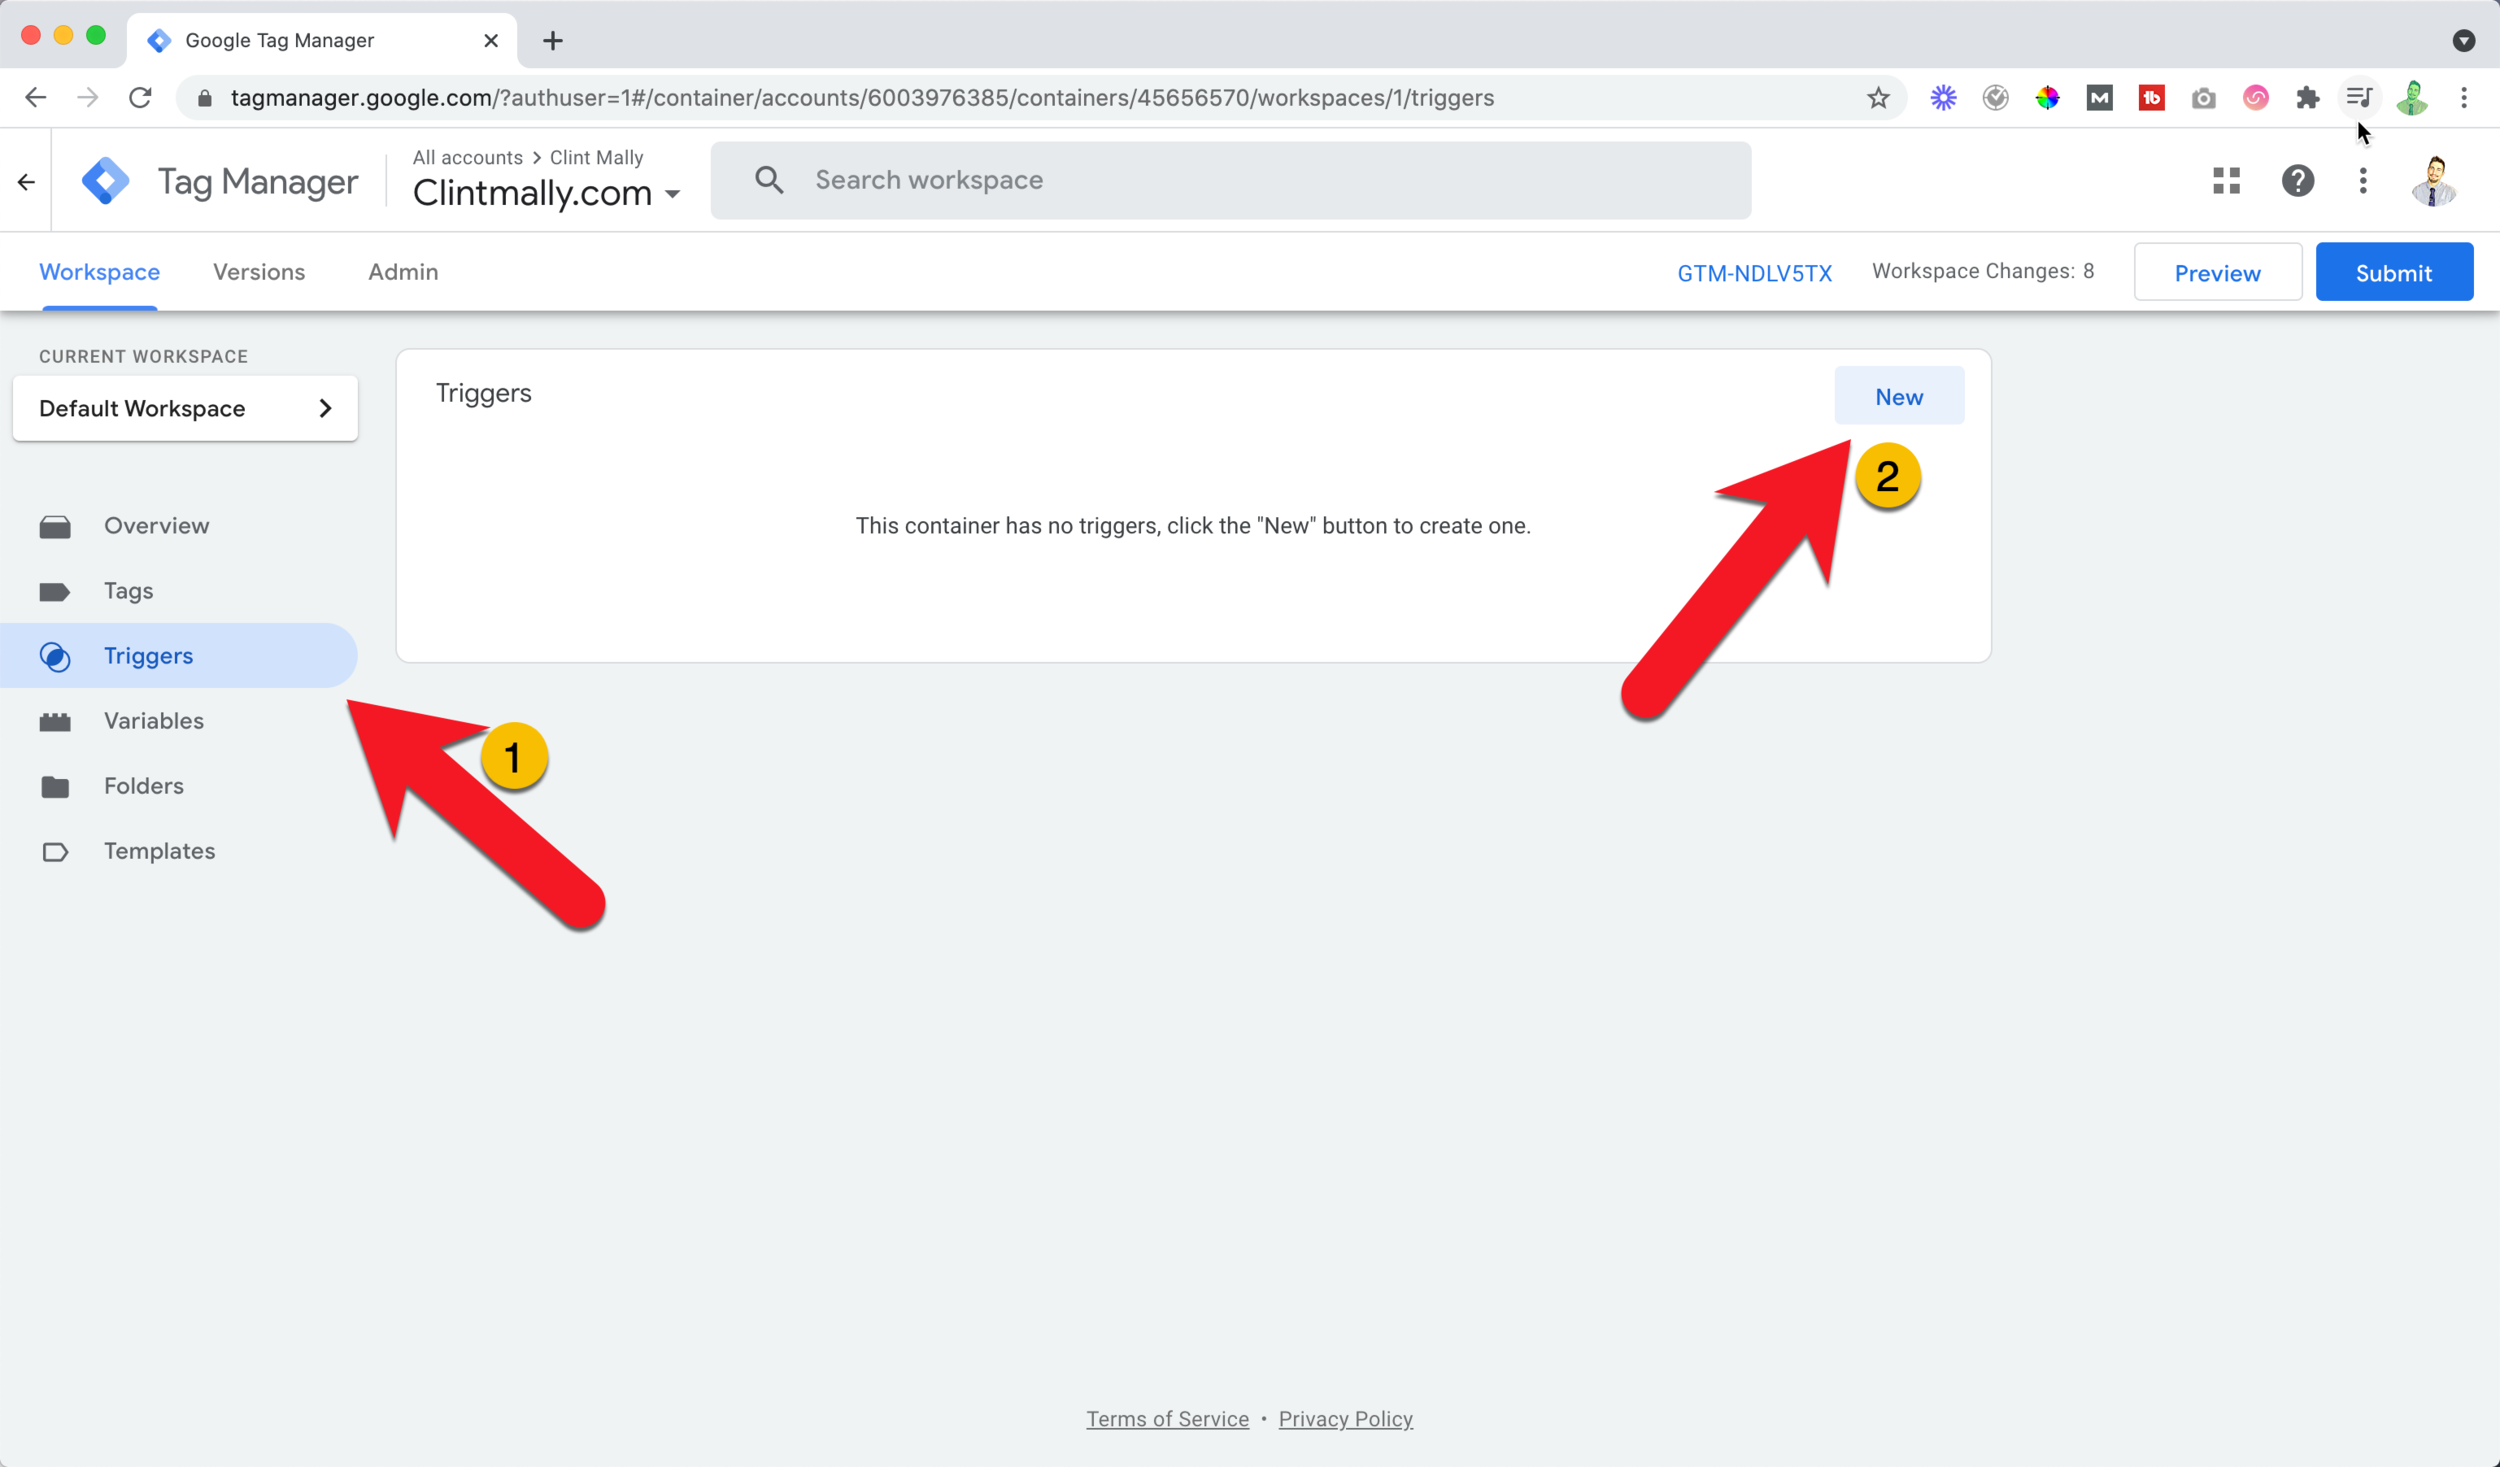
Click "triggers" in the left-hand navigation.
Then click "new" in the top-right.
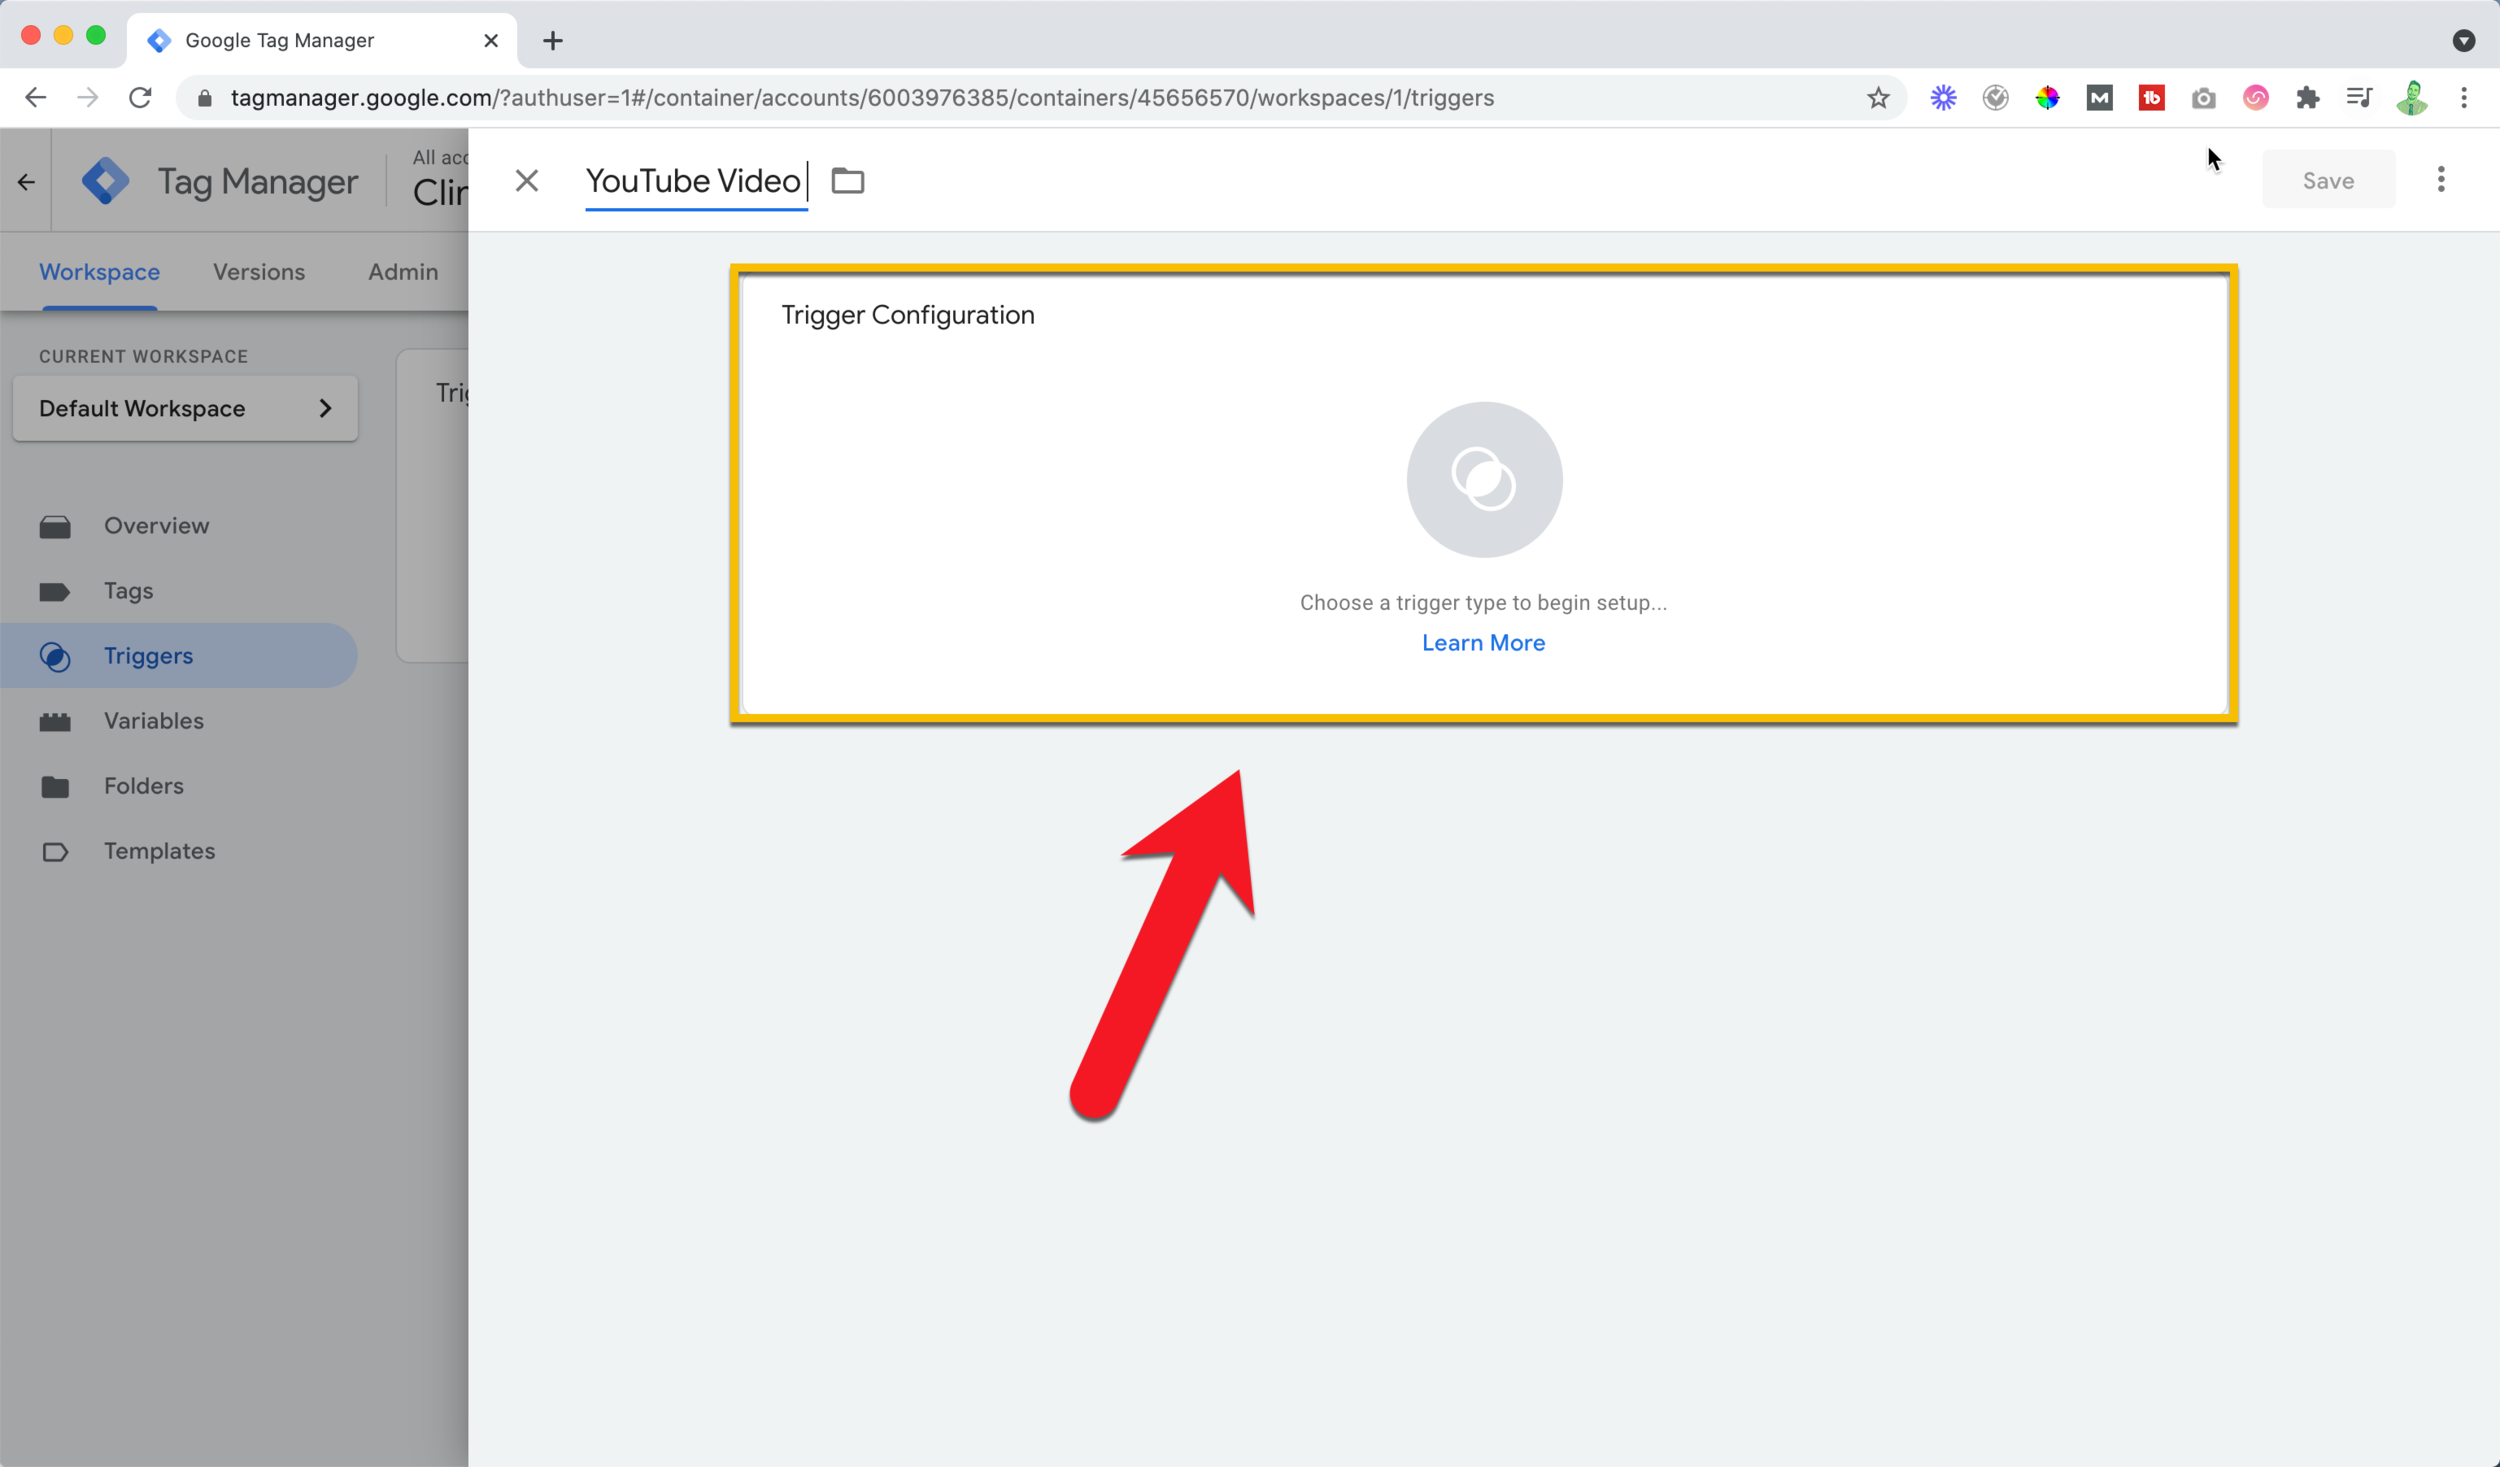
Name your trigger something that will help you know what it is actually being used for, like "YouTube Video."
Click anywhere in the big white rectangular box.
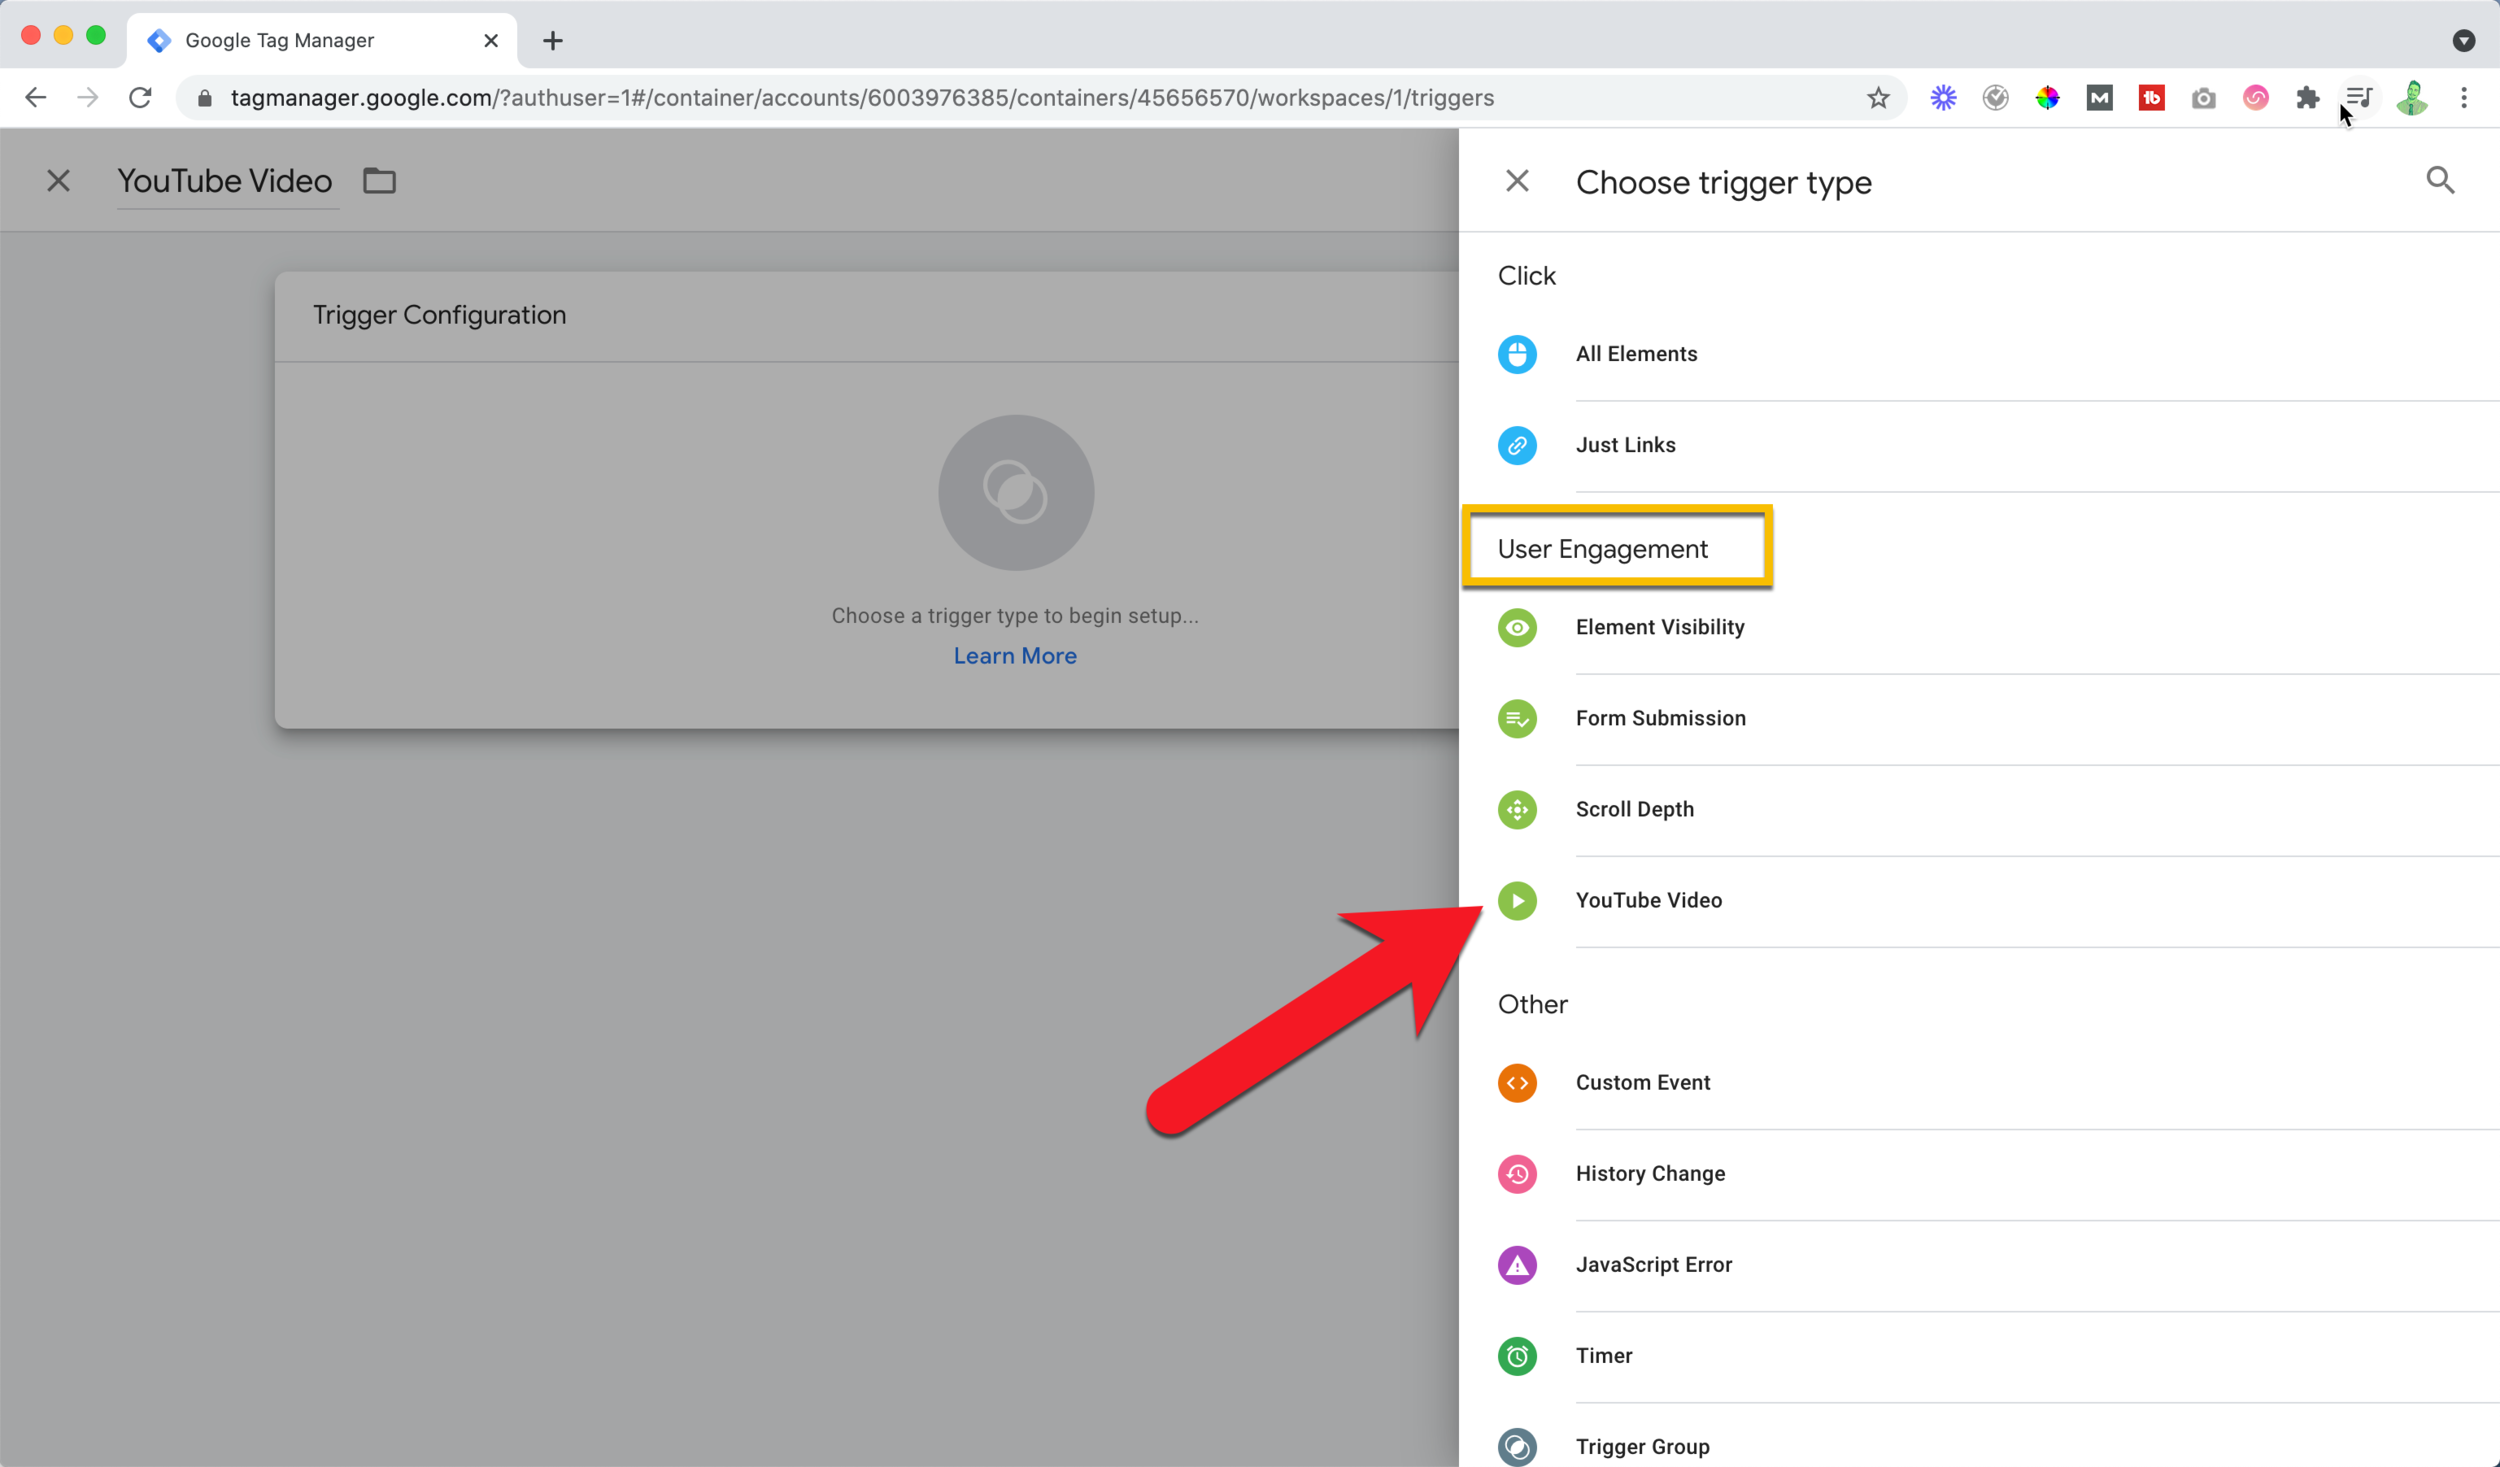
Click the built-in trigger under "user engagement" called "Youtube Video."
Check all the buttons and for "progress" choose "percentages."
Add some percentage markers. I like "10, 25, 50, 75, and 90."
Under "enable the trigger on" make sure it is set to "DOM Ready."
Make sure "all videos" is selected.
Then click Save.
Step 3: Create the Tag
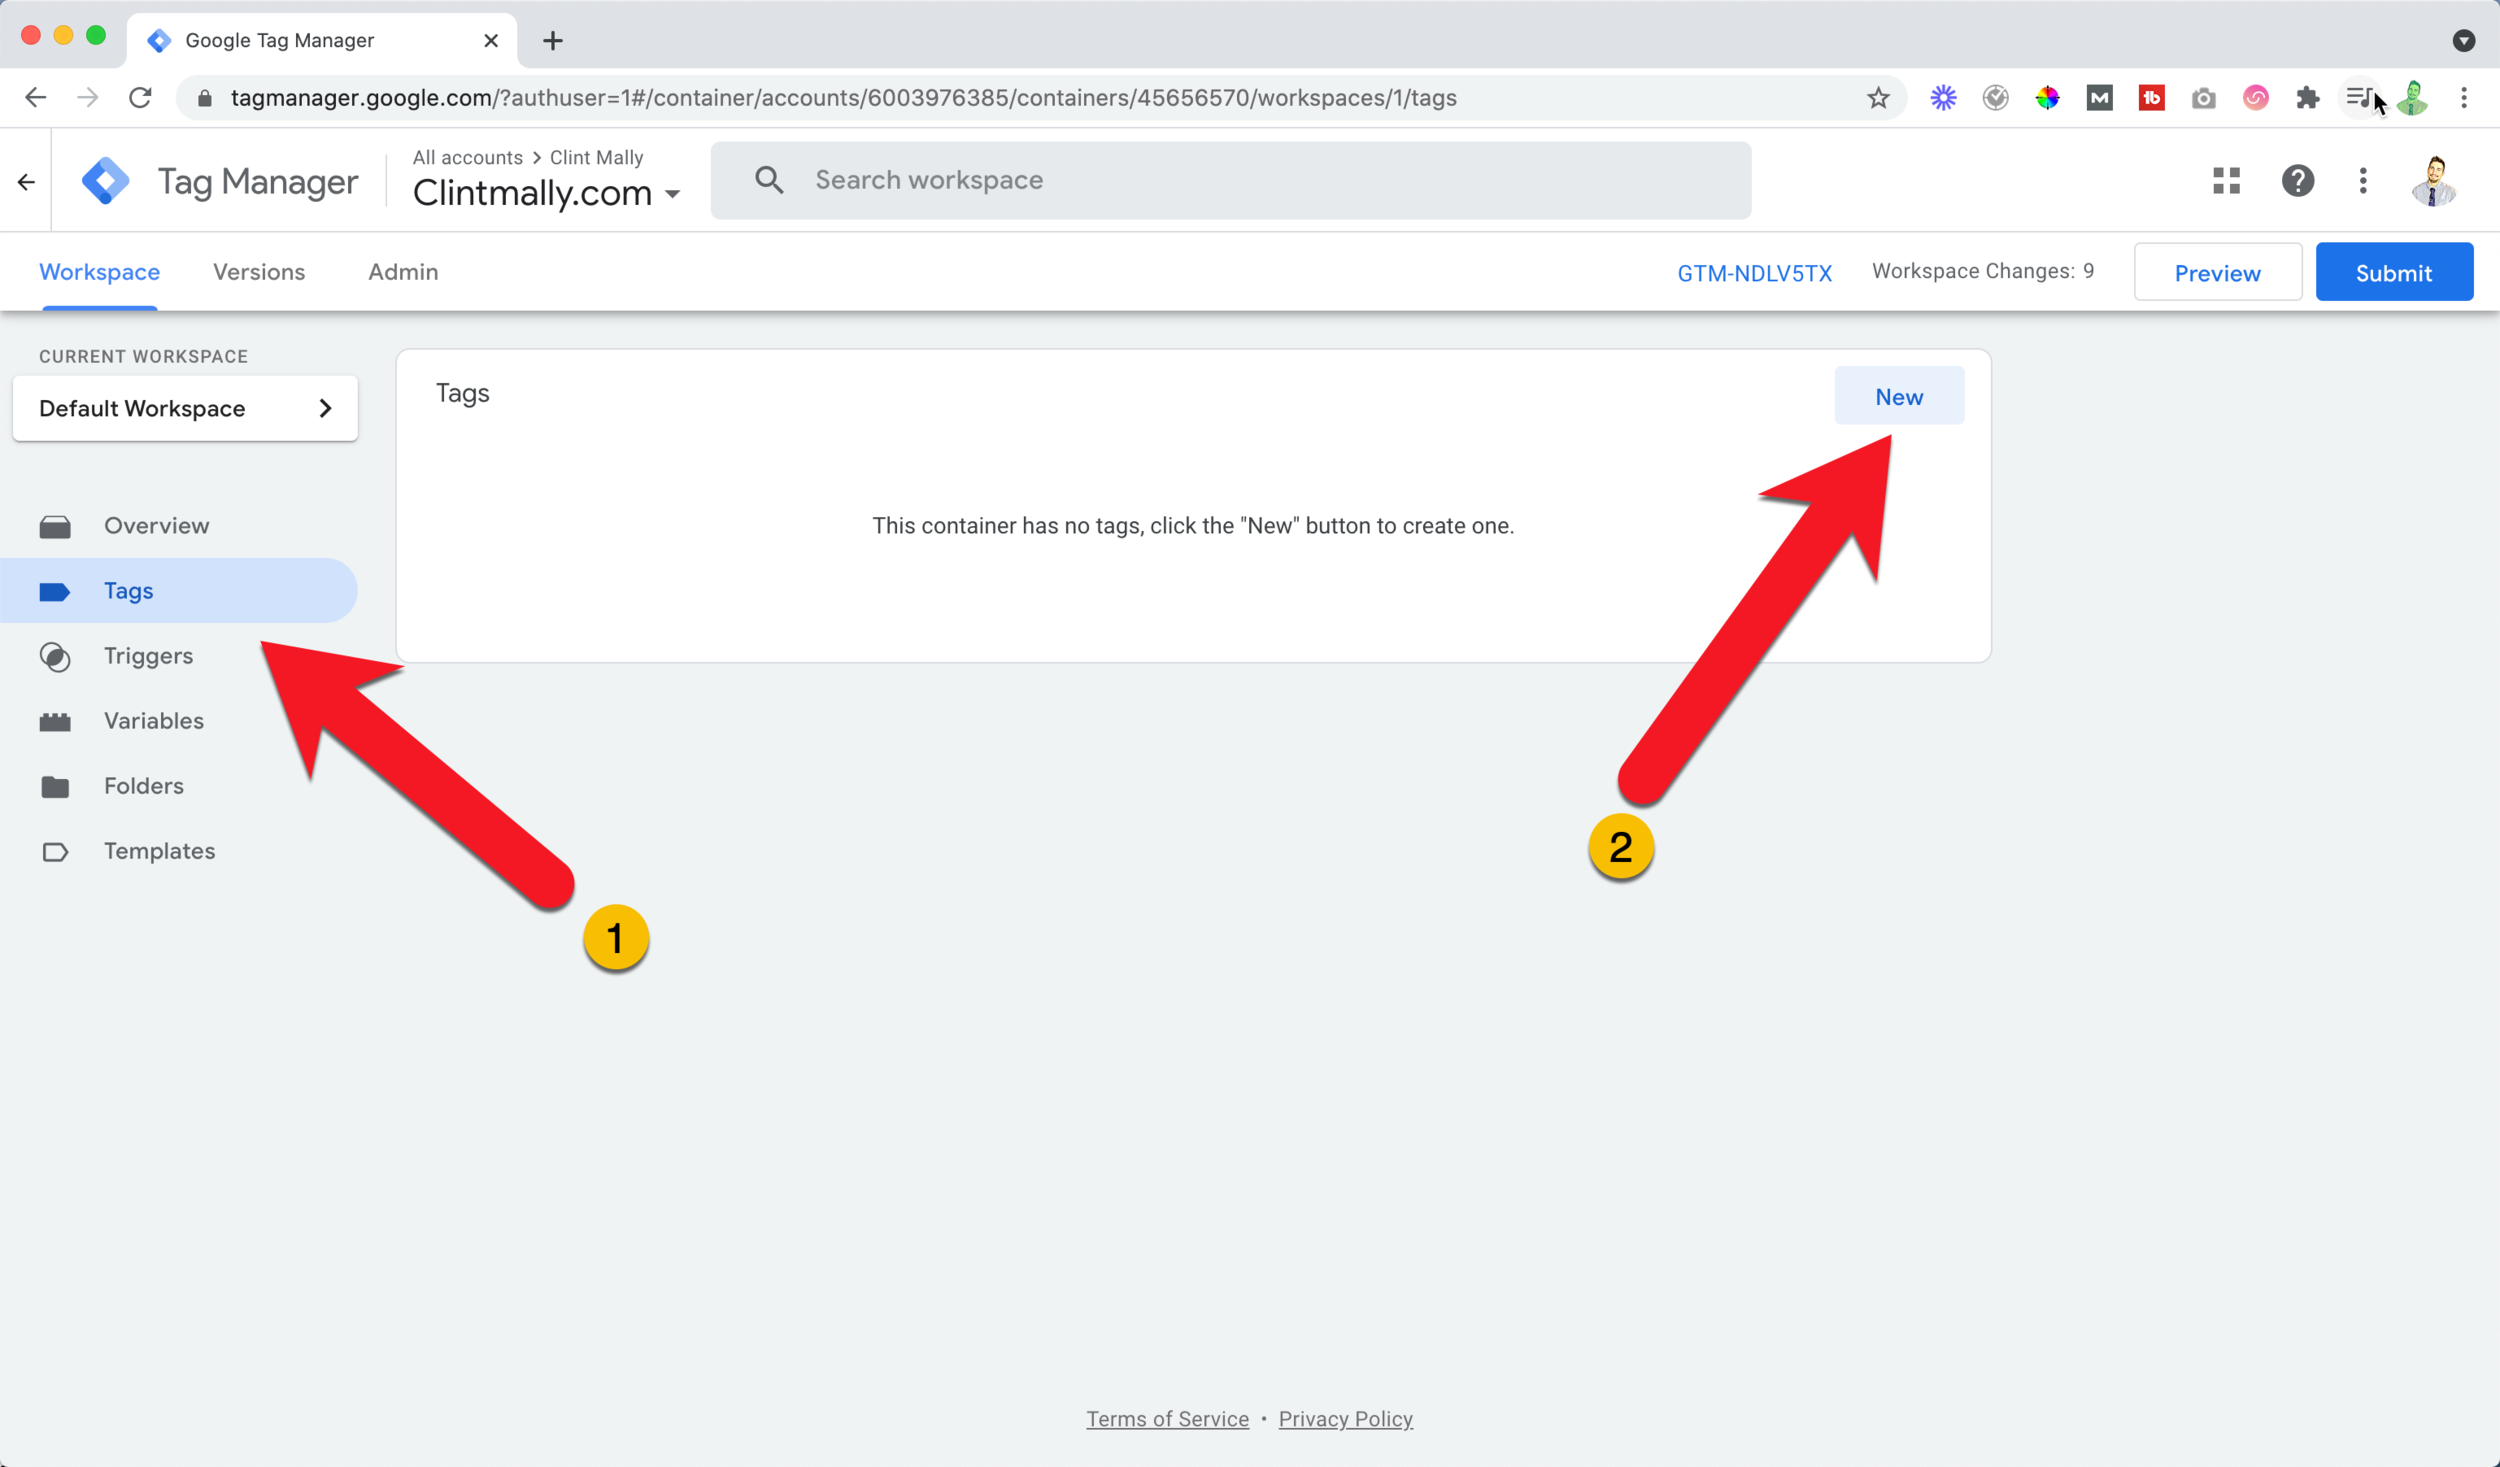
Click "tags" in the left-hand navigation, click “new.”
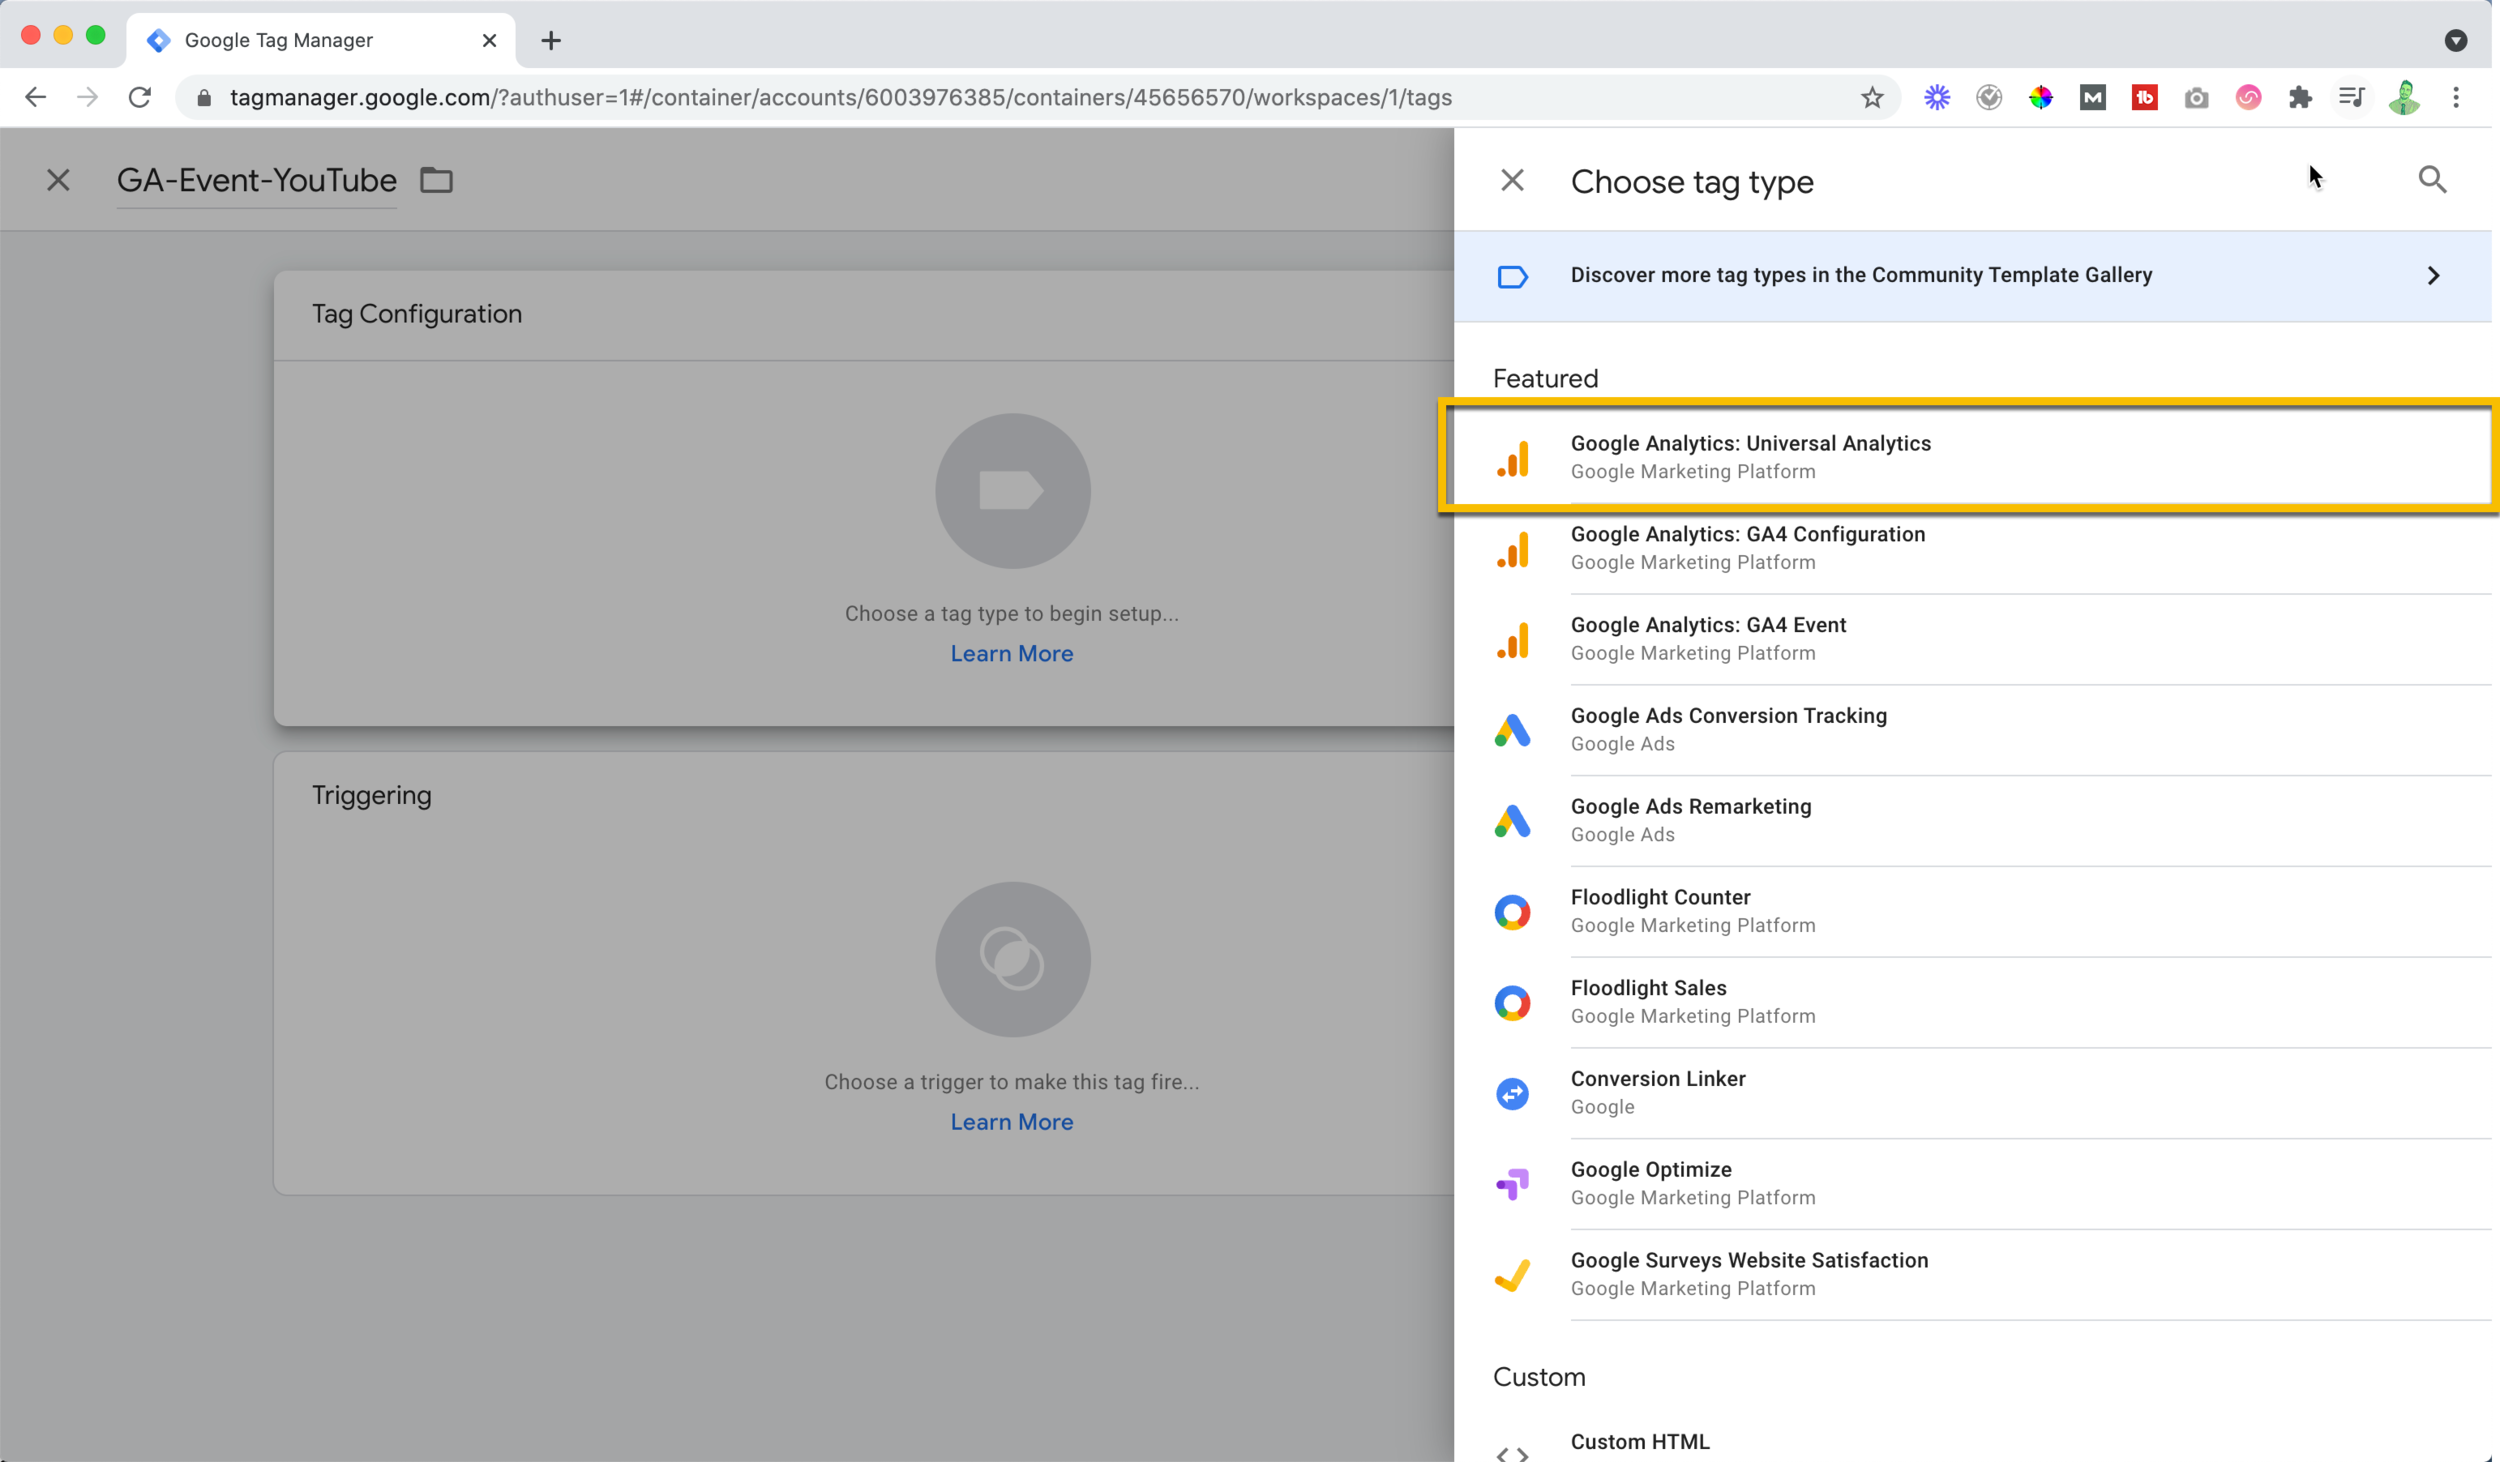
Give the tag a name. For example, "GA-Event-YouTube." Click the white rectangle that says "tag configuration."
Click "Google Analytics: Universal Analytics."
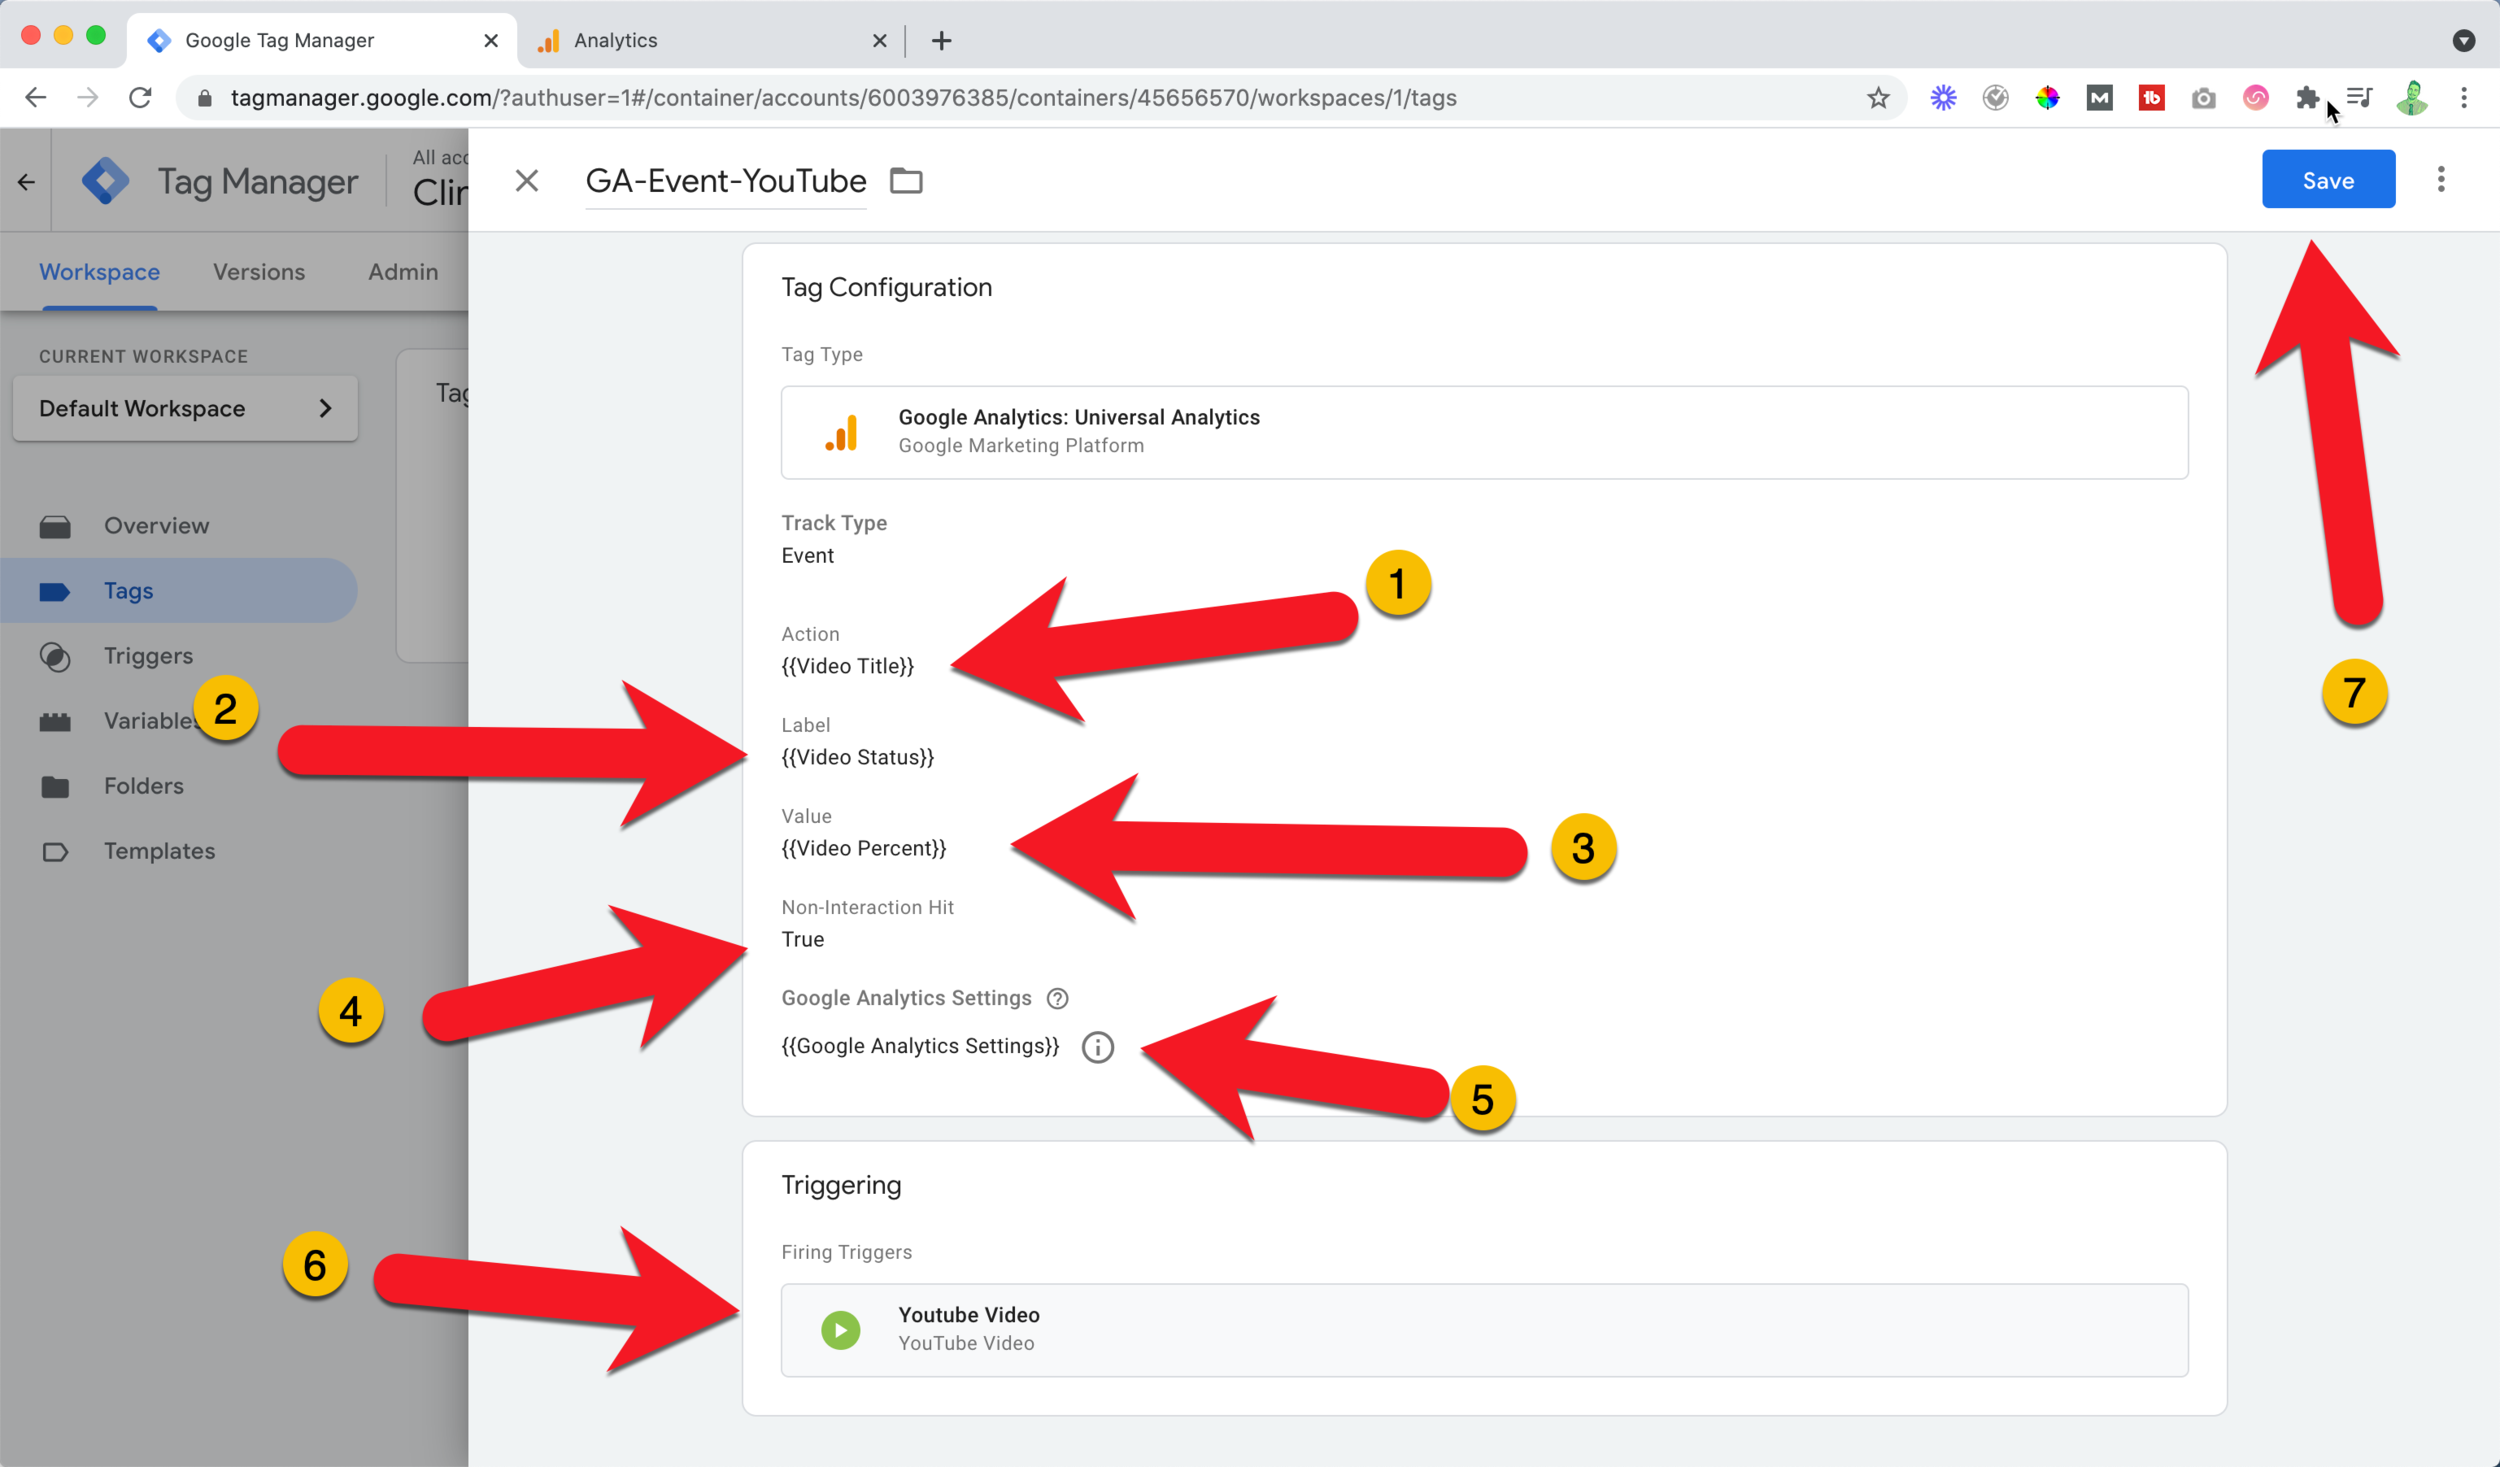
Change the "track type" to "event."
For "category" put "video view.”
Click the lego plus icon next to "action" and choose "video title."
Click the lego plus icon next to "label" and choose "video status."
Click the lego plus icon next to "value" and choose "video percent."
Change the "non-interaction hit" to "true" so that this does not affect your bounce rate calculation for the page.
Under the "Google Analytics setting” select your connected account. If you haven’t set up Google Analytics yet you can see my walkthrough on how to set it up.
Click the trigger rectangle below and select the trigger you created and named earlier.
Click save.
Step 4: Submit the container
Click “submit” at the top-right.
Name the container. For example, "YouTube Video Tracking."
Give a description such as "added event tracking for YouTube videos."
Click publish. Wahoo!
Seeing the results of your video in Google Analytics
To see the results, go to Google Analytics, click “behavior” in the left navigation. Click "site content" and then "all pages."
Put the URL of the webpage you would like to view in the search bar.
Click your webpage in the results.
Create a segment for video watchers in Google Analytics
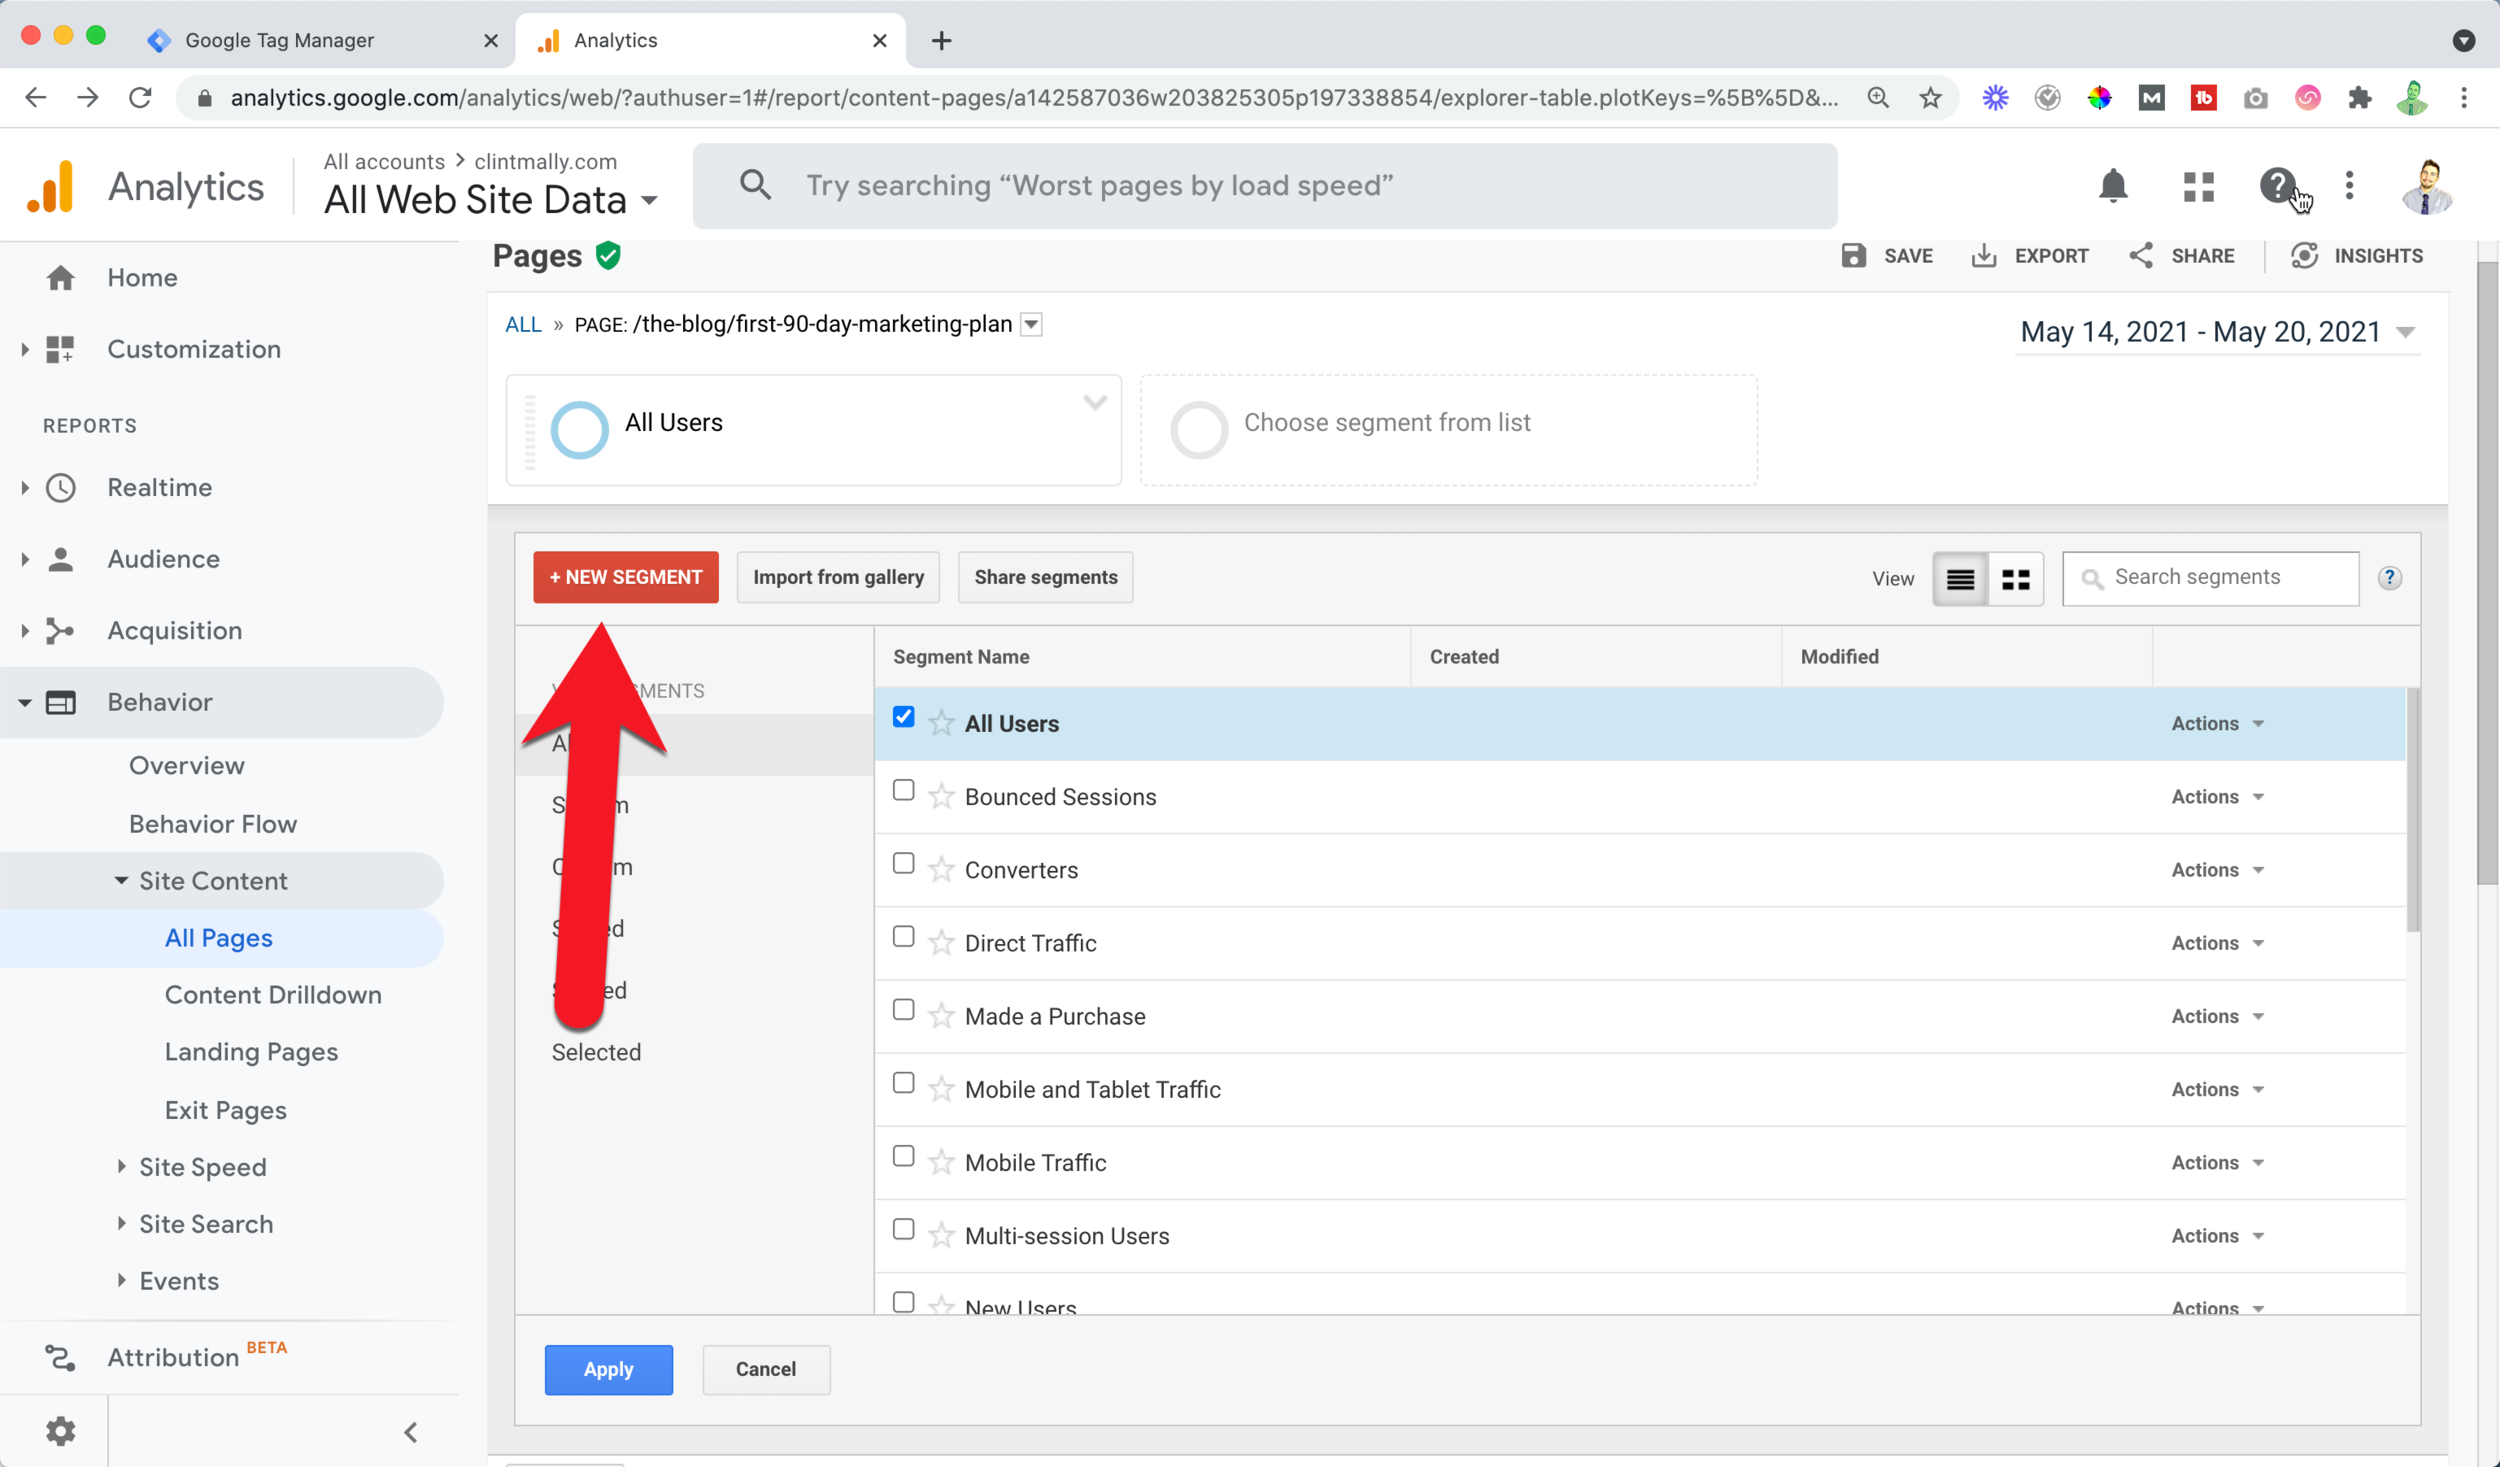
Click "add segment" at the top.
Click “new segment.”
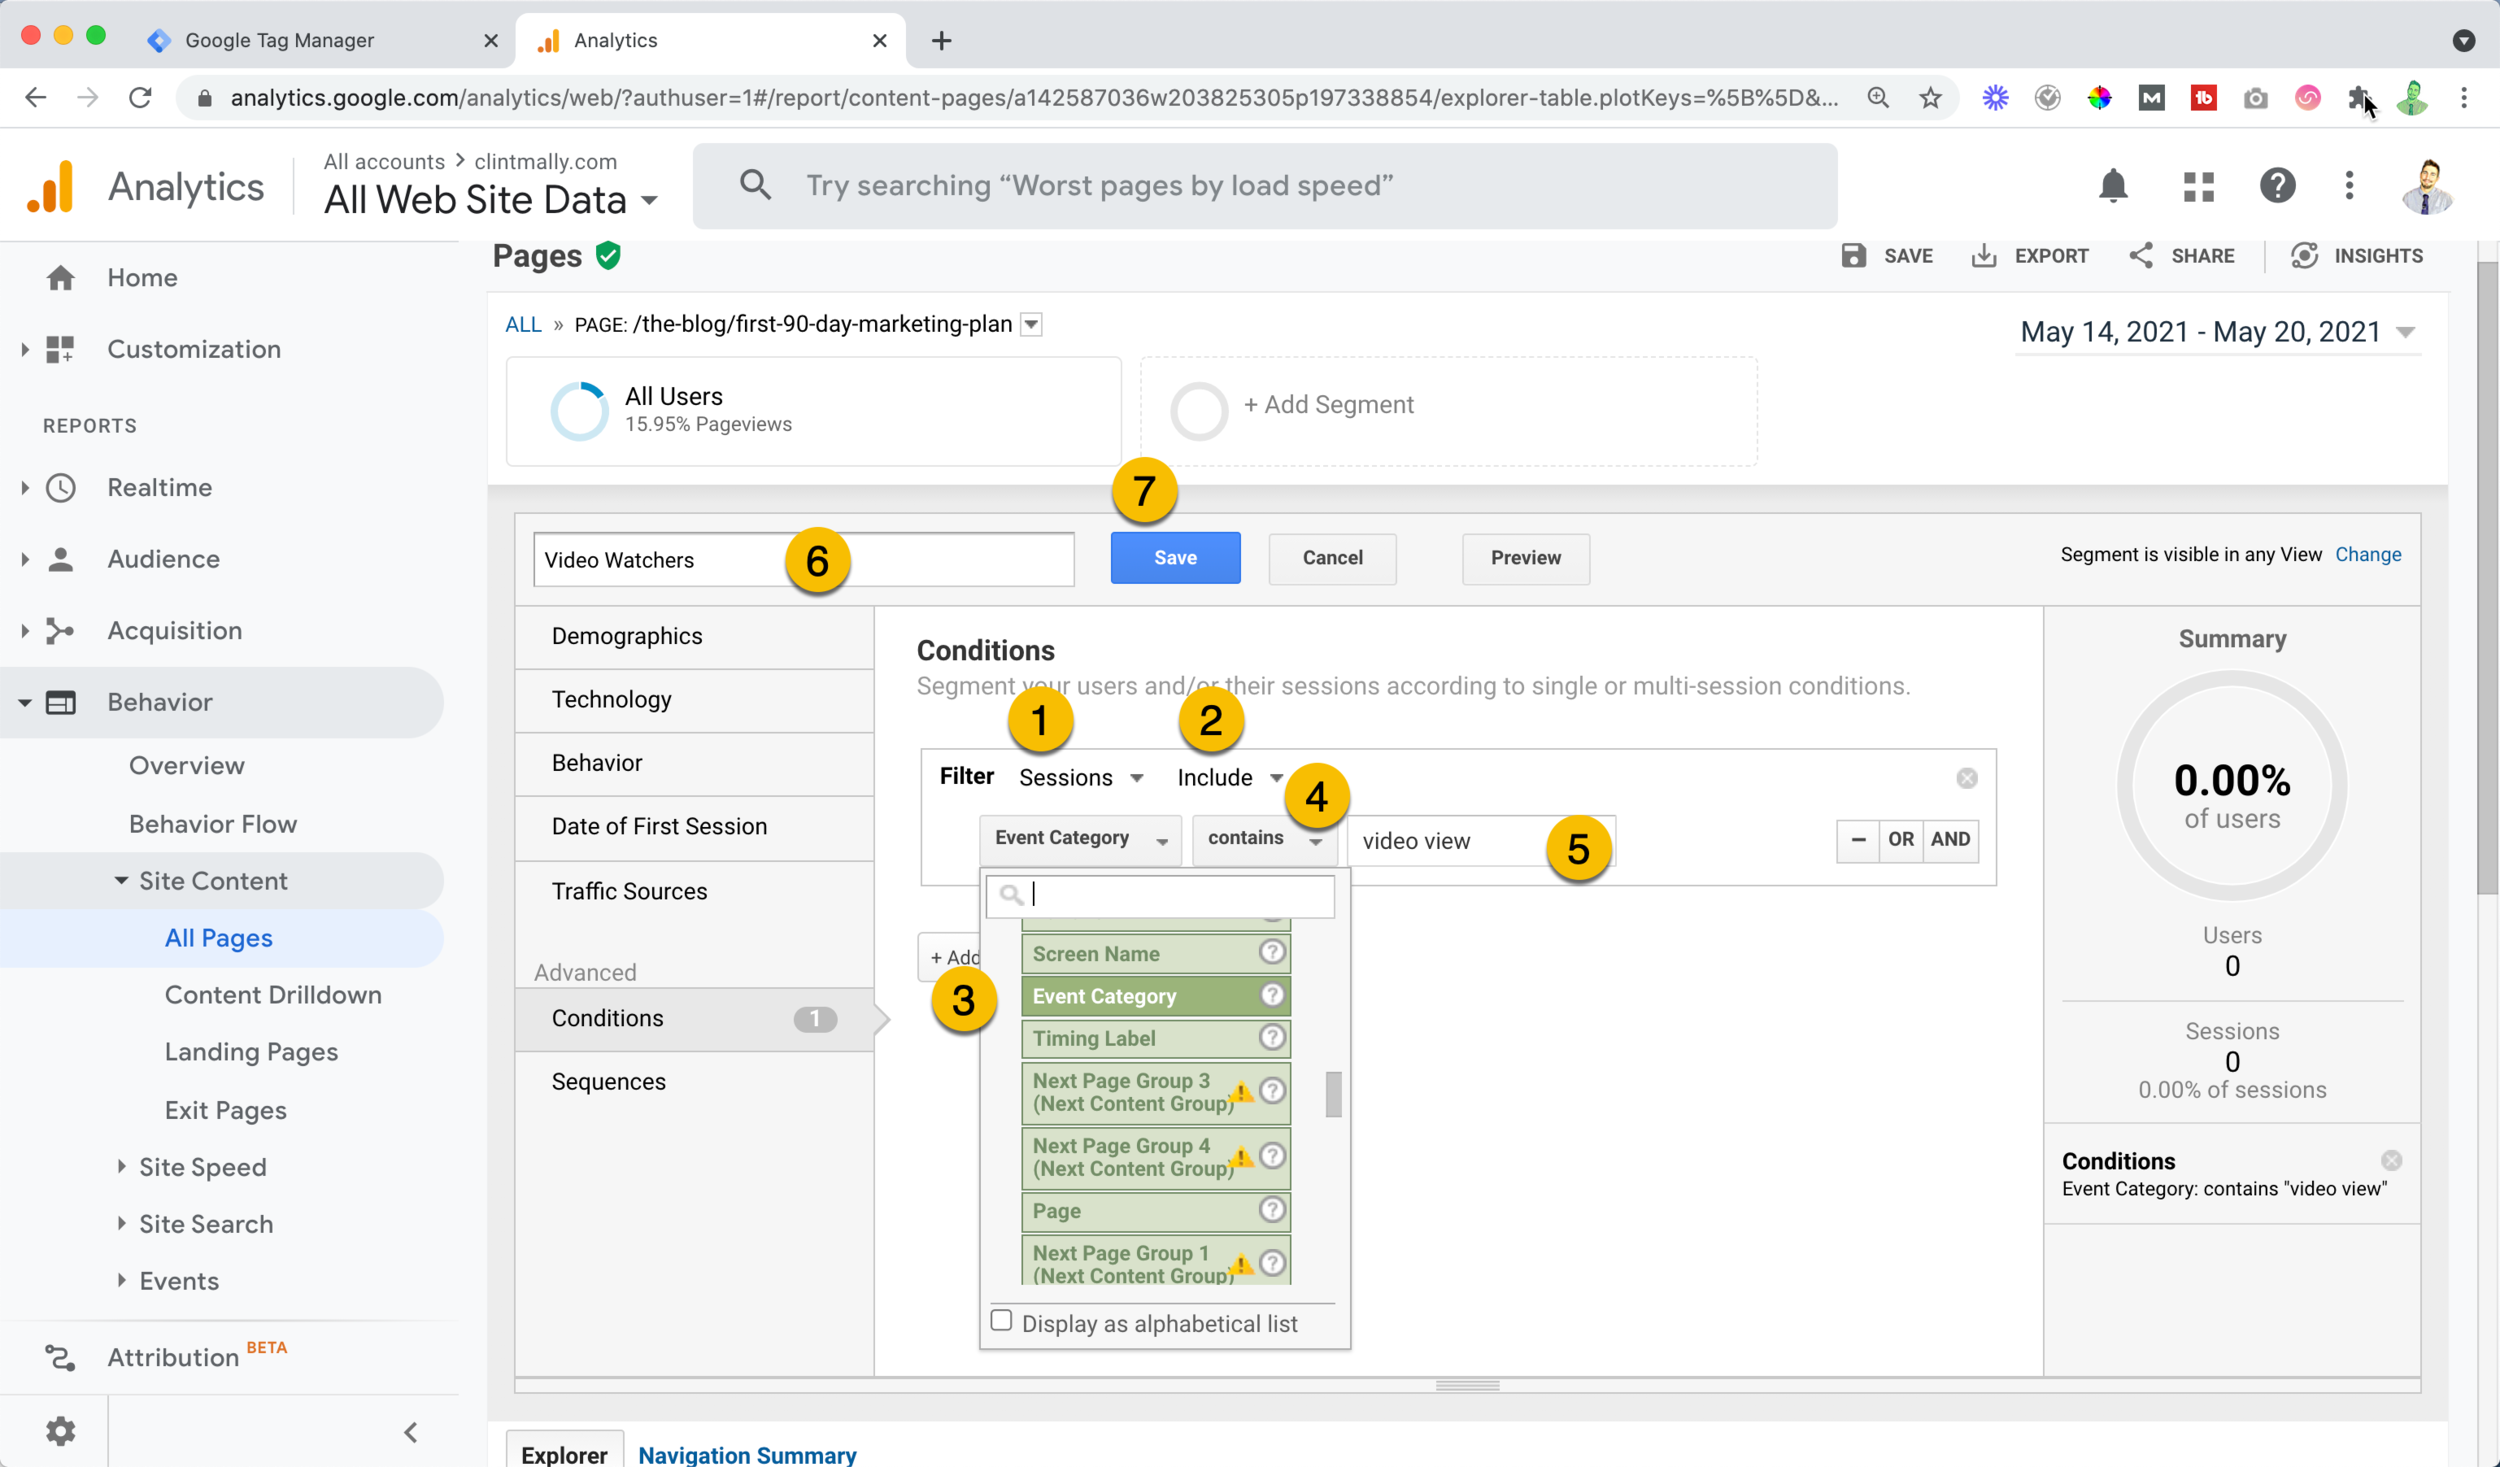
Click "conditions."
Choose "sessions" and "include."
In your filter, search "event category," "contains," and enter "video view."
Notice your percentage of users who view the video in the top right.
Name the segment "video watchers" in the top-left and click save.
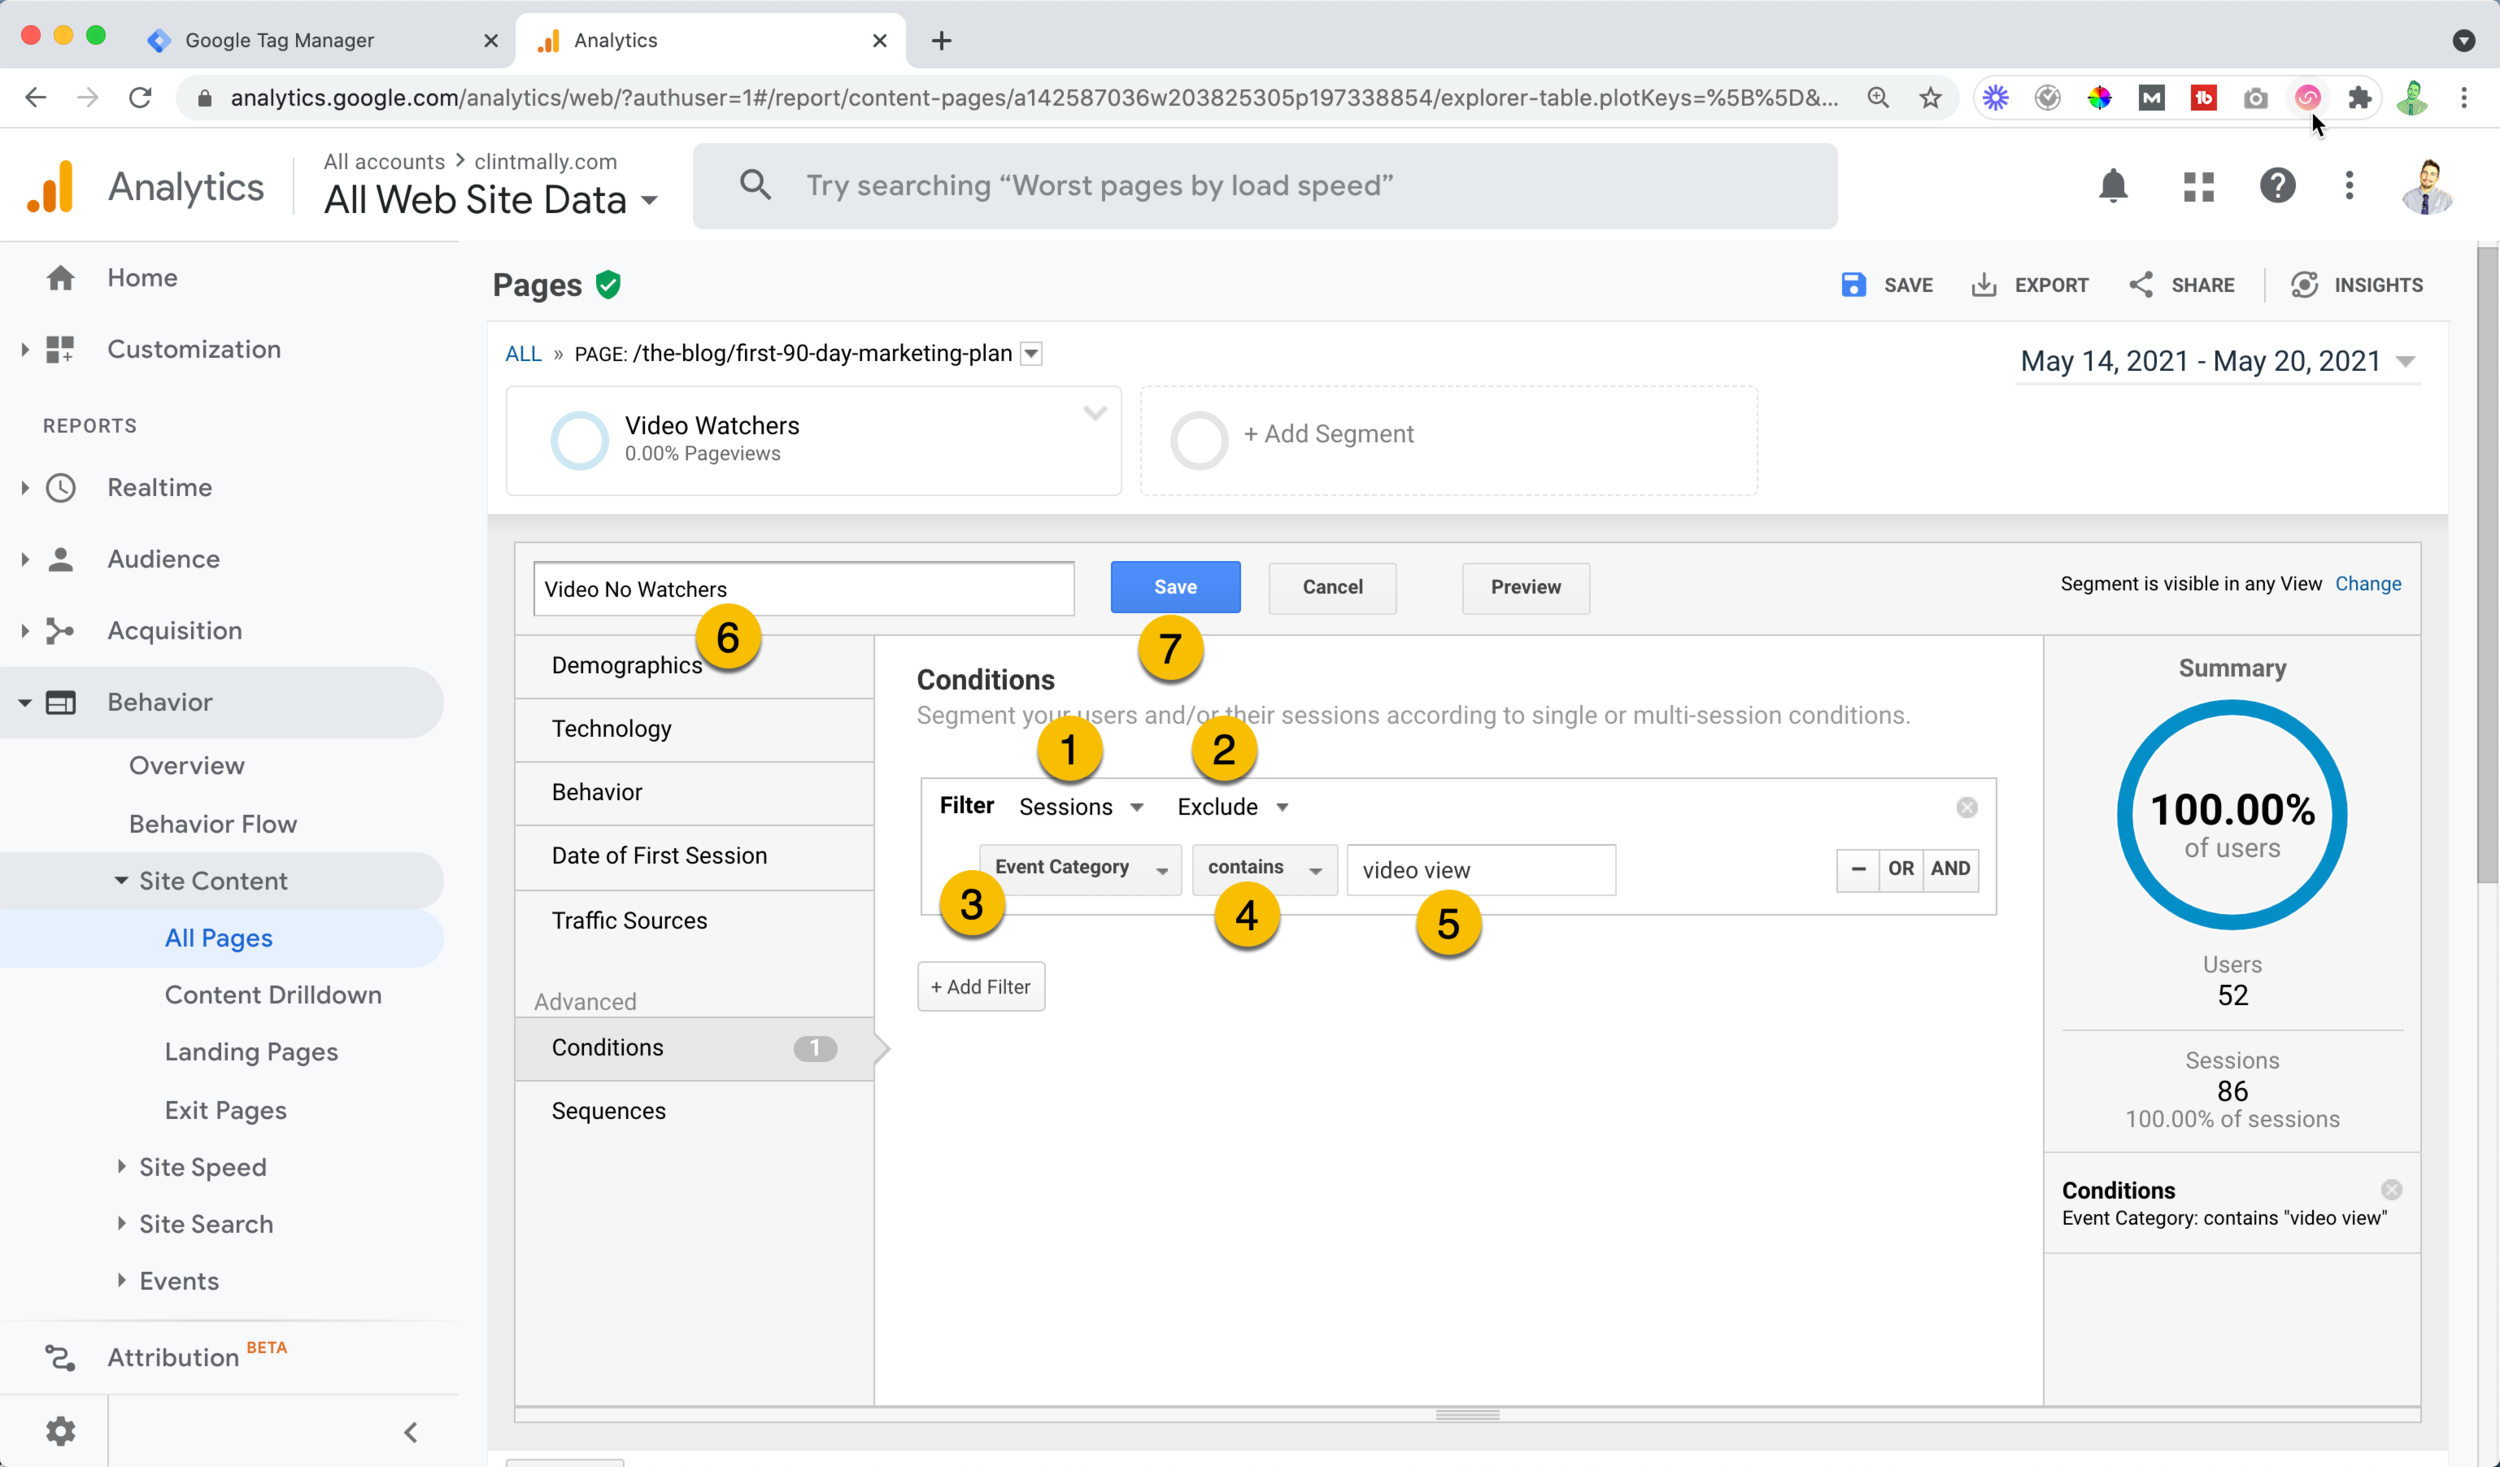
Create another segment for people who don't watch.
Click “add segment.”
Click “new segment.”
Click "conditions."
Choose "sessions" and "excludes."
In your filter, choose "event category," "contains," and enter "video view."
Now you can see the percentage of people who don't view your video.
Name the segment "Video no-watchers" and click save.
*Note I am adding this to a new website so I don’t have much data yet.
What does video data reveal for video watchers on web pages?
Now you have a way to show how people who watch videos on your web pages:
Have a lower bounce rate.
A longer dwell time or session duration.
A higher conversion rate.
21. Different Types of Videos For Content Marketing
It might seem like there are a ton of different types of videos you can use, but remember that every piece of content, whether it is a blog post or a quality video, needs to solve a problem and be helpful.
Here are some of the types of content you can use for your video marketing strategy.
Below you can see some examples I created for WriterAccess.
Lead Generation Videos (Top of Marketing Funnel)
These are purely informational, entertaining, or both. They are meant to add value first.
Here is where you show people that you are helpful. Don't talk about your new product here, or how great your marketing tool is. Instead, give something away for free. Your CTA could be:
Join my FREE e-course...
Download my FREE one-page PDF guide...
Watch my FREE tutorial.
Your goal is to get someone’s name, email address, and if you are lucky their phone number, too.
Video Ads (Middle of Marketing Funnel)
Once you have added some value, you can re-target prospects with a video ad. Retarget customers by:
Sending video ads to people who submitted contact information.
Sending video ads to people who watch a significant portion of your lead generation video (25-100% depending on video length).
You goal here is to explain how your product or service makes their life better and get a new customer. These should be short, 29 to 59 seconds.
Because you have already added value, use simple and clear messaging and come right out with it.
And your CTA should be simple and to the point:
Start a FREE trial.
Schedule a consultation call.
Buy my product.
Website Videos (Bottom of the Marketing Funnel)
Someone has landed on a checkout page, or on the core pages of your website. Give them videos that reinforce that they are making a good choice. These could be:
Customer testimonial videos: Create short videos with only the highlights of how your product or service helped solve a problem. These can also be case studies of how you have helped other businesses.
Explainer videos: Show how your product or service works. Break it down in 3 steps. If it is more than 3, people will not remember it.
Summing It Up
All types of videos are great and they will help your audience connect and engage with your business and boost your brand awareness.
I love blogging and I am an avid podcast listener, but focusing your marketing efforts on video is still the key to success!
Follow a process or template like the one I outlined in this post to create consistent, value-driven, and quality video content. It doesn't matter if you are making live videos for webinars or a video for Snapchat. You need a process.
Batch create your content to get ahead and scale your efforts.
Repurpose your amazing content like crazy across social media and your email network.
Have fun and be yourself and your content will shine amidst the boring, serious folk.
Hey, I'm Clint.
I love to create content that helps businesses and agencies get better results faster


